Cleaning and maintenance of G.I.S. silencers
- Failure to follow the installation and maintenance instructions described in this document can result in serious personal injury and damage to the weapon.
General informations:
The internal components of the silencer are intensively clogged with combustion products during firing, and therefore it is necessary to clean the silencer. Frequency of cleaning and maintenance depends on intensity and usage of silencers.
We recommend cleaning of silencer max. after every 500 rounds fired (250 rds at PSR pistol silencers due to propper function of pulse amplifier.
The more often the silencer is cleaned, the easier the cleaning process is.
Some of our silencers are constructed to be fully disassembed for maintenance. Some can be disassambled only partially and some cannot be disassembled for security reasons – it is therefore possible to clean them only chemically, by rinsing cleaning solution. It is advisable to use cleaning agents that dissolve combustion products.
Avoid using sharp tools for cleaning as they could damage the surface finish of the silencer parts. It is advisable to use cleaning agents that dissolve combustion products.
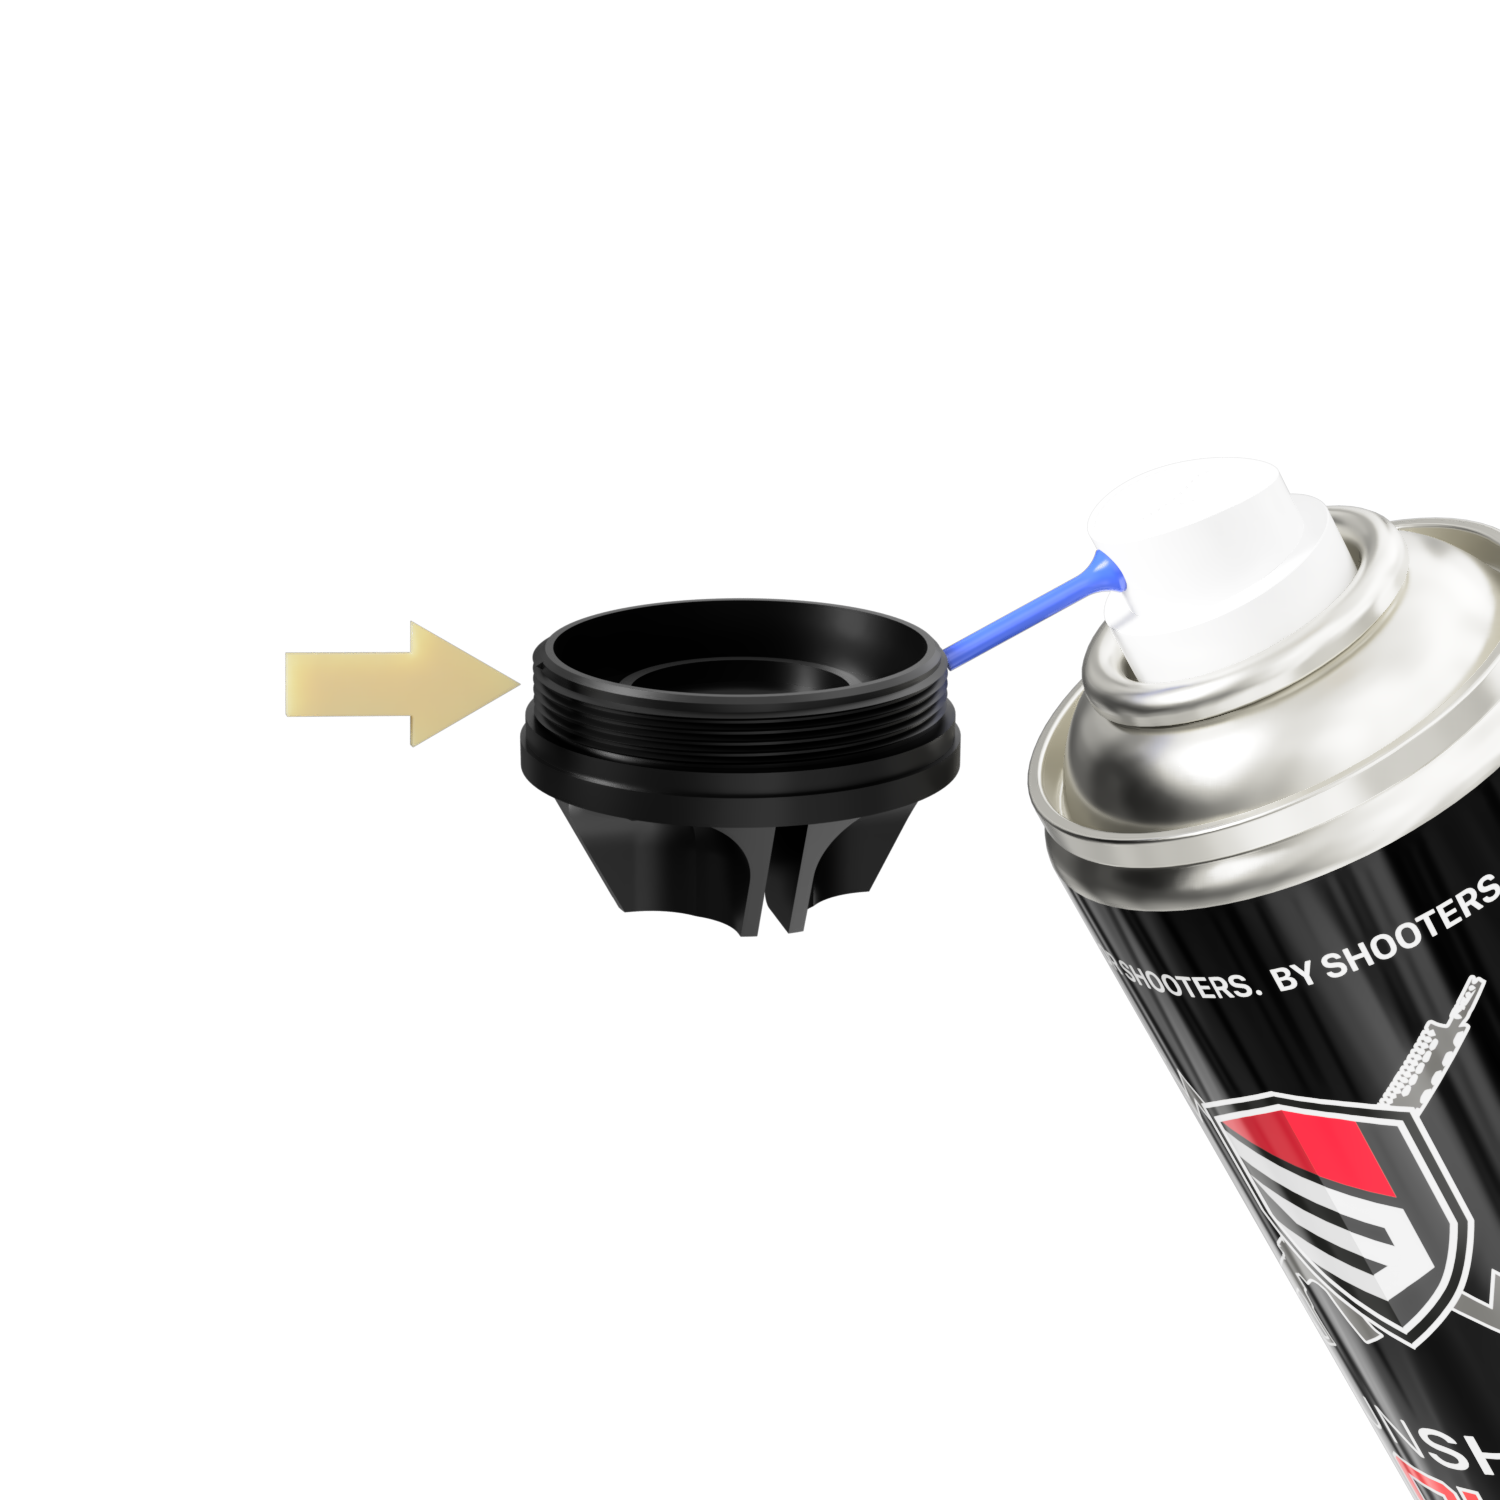
Chemical solutions designed for cleaning black gunpowder muzzle-loaders work very well. Strictly follow the manufacturer‘s instructions when using them. When pouring the cleaning solution from the suppressor and its flushing it is necessary to hold the suppressor mouth up. Another position will not allow the cleaning agent to drain away completely.
Before using the suppressor after cleaning, dry it thoroughly and make sure the center hole the suppressor is free throughout in its entire length.
- ATTENTION! Never use volatile substances for cleaning. Their use can cause a malfunction of the silencer and endanger human health and life.
Choose your silencer model:
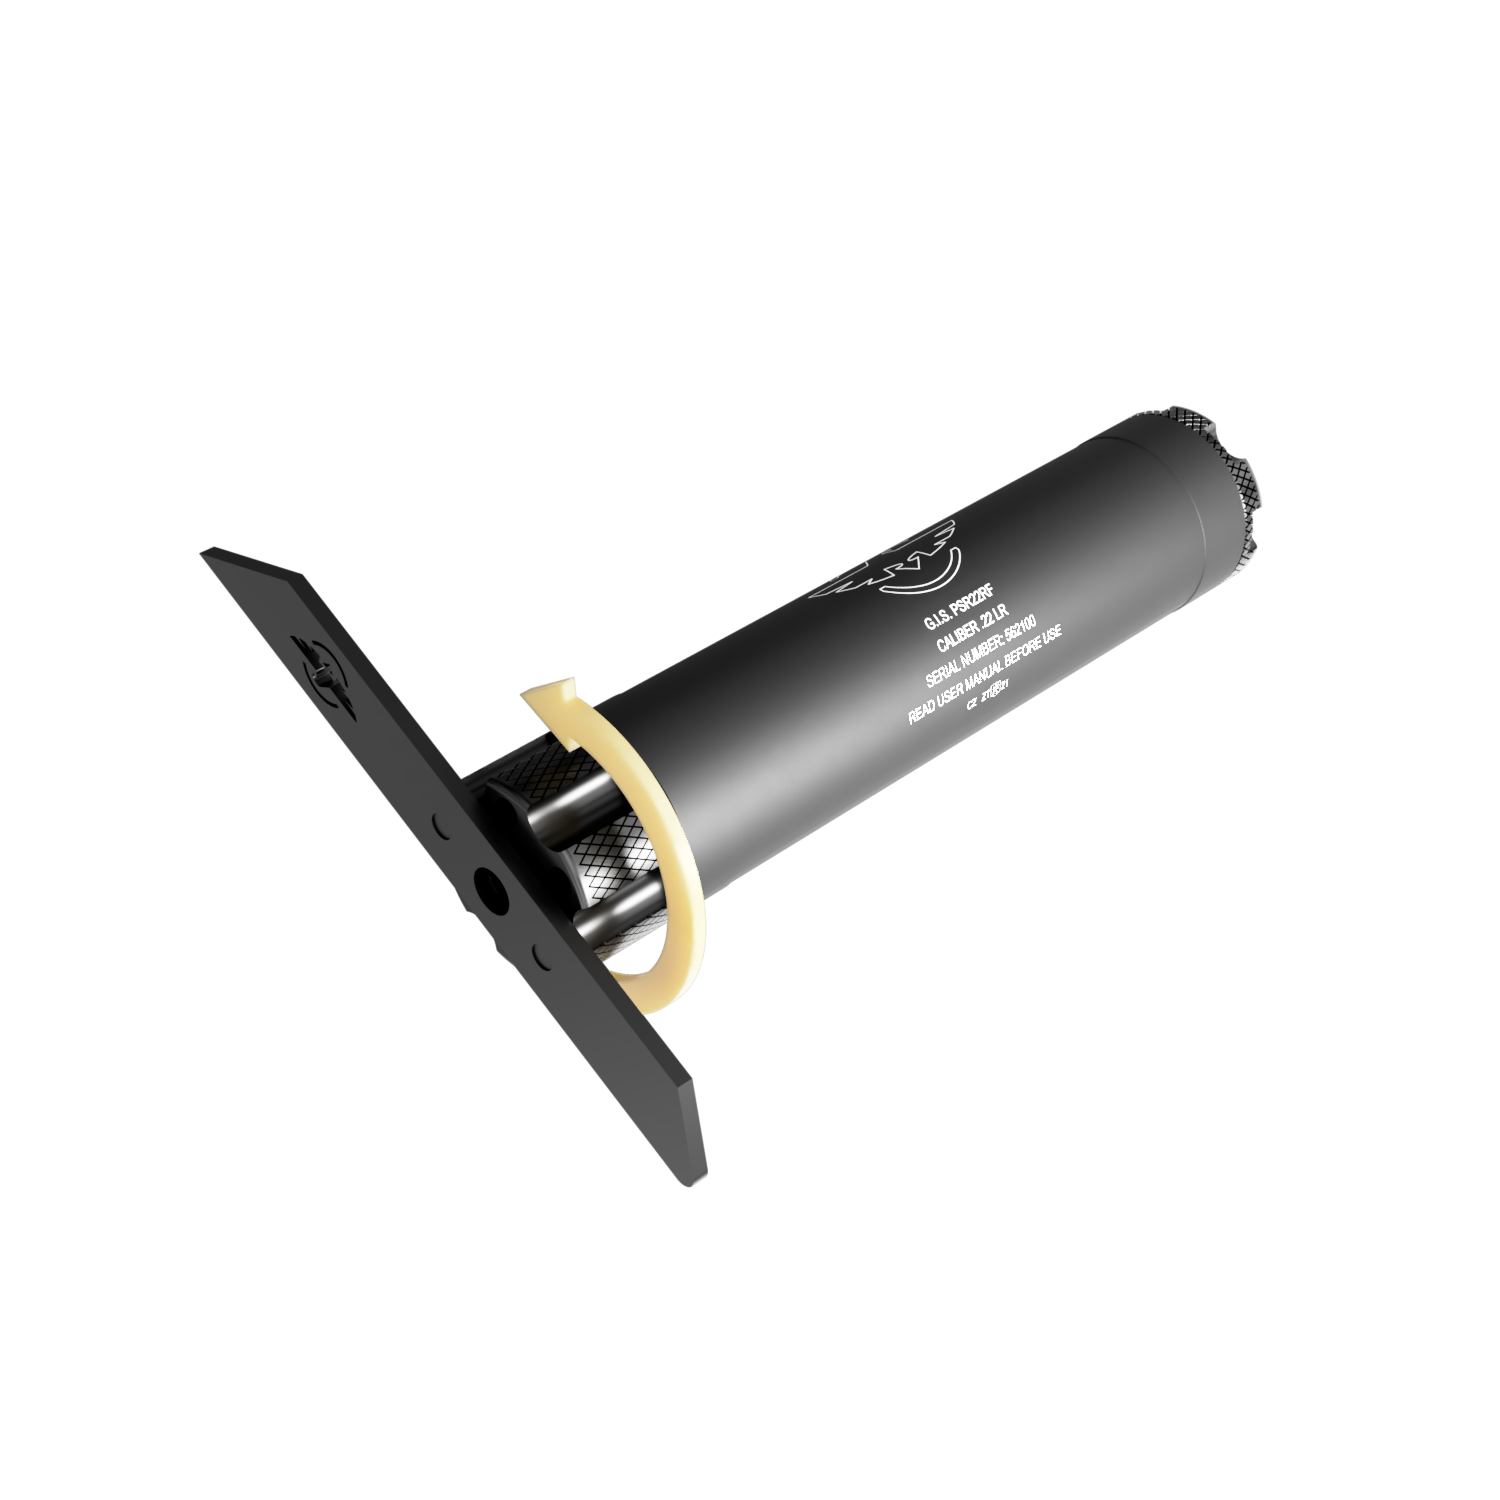
G.I.S. RSR22RF
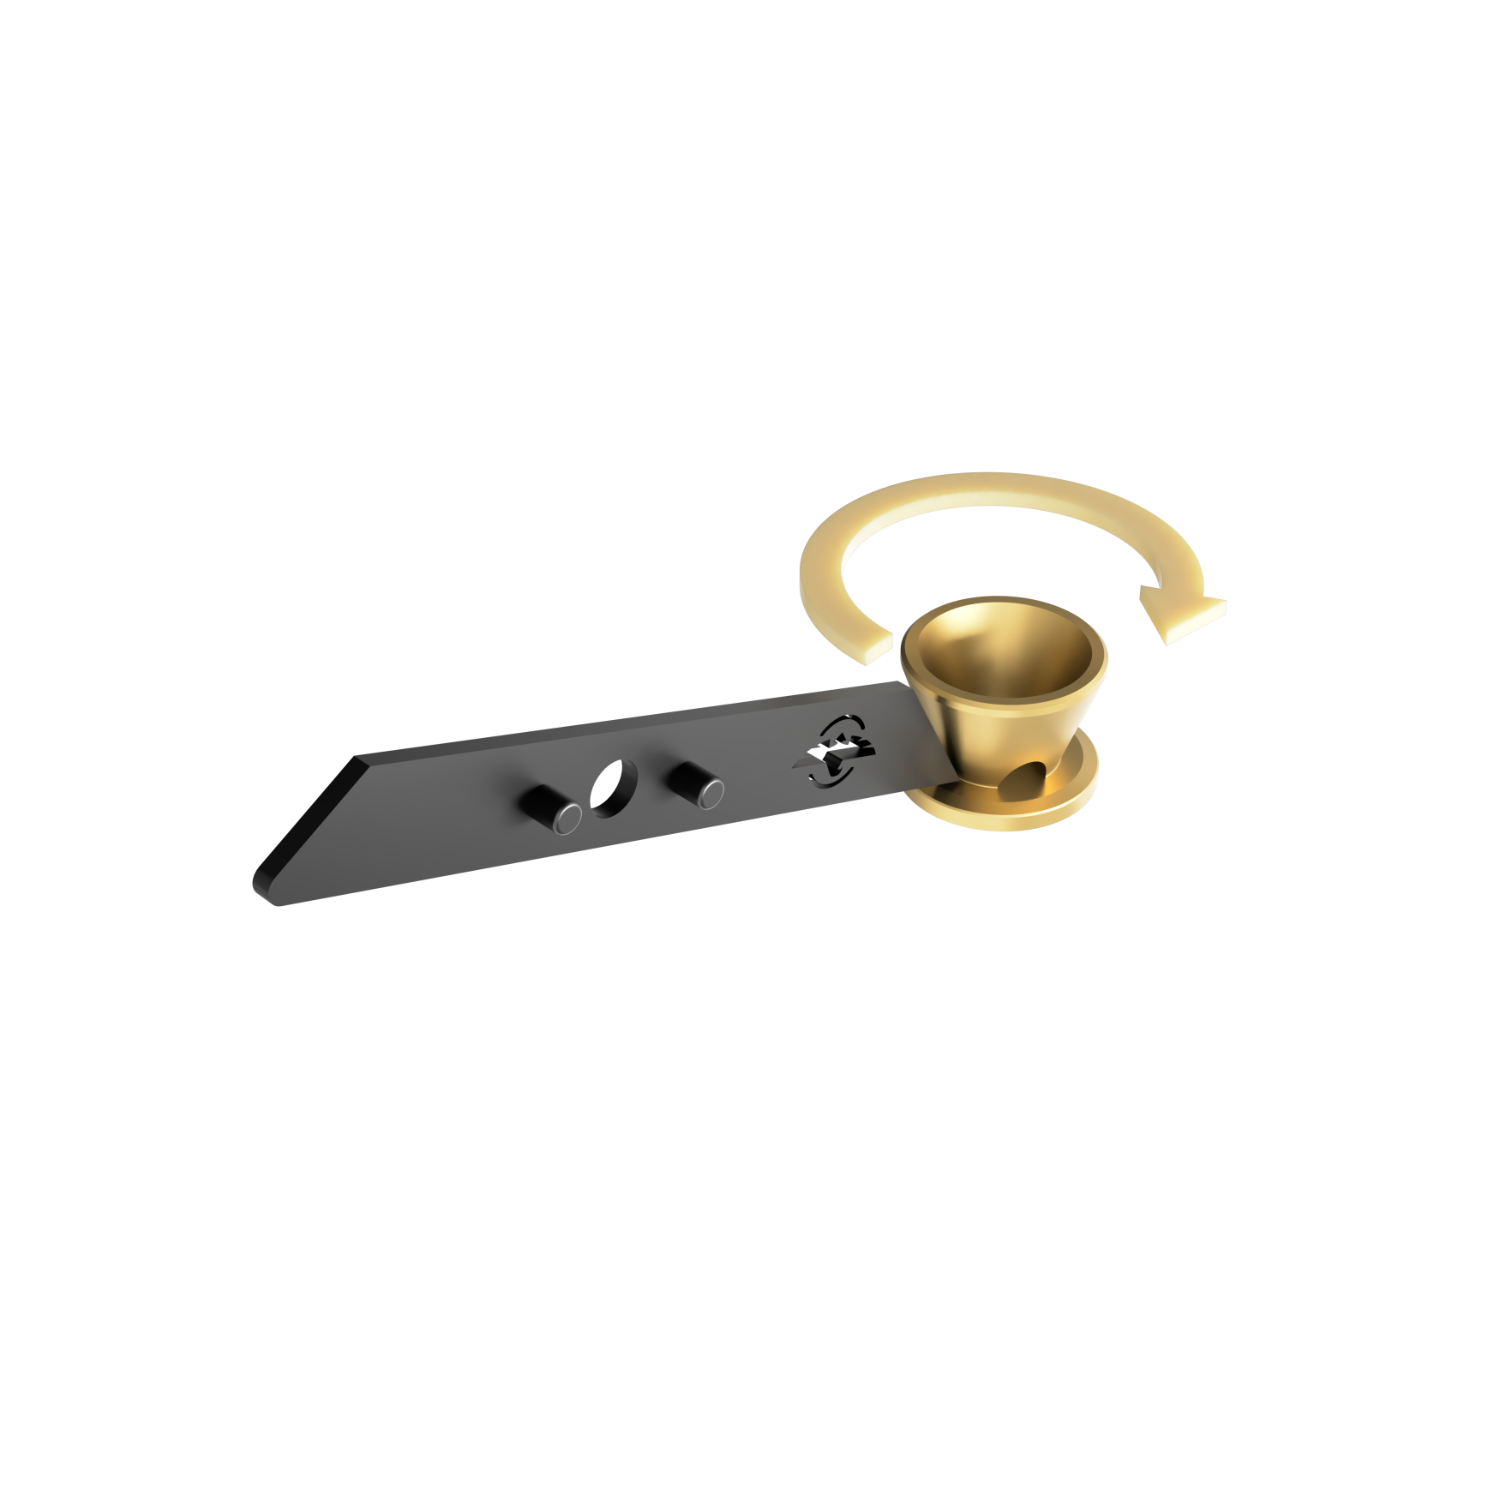
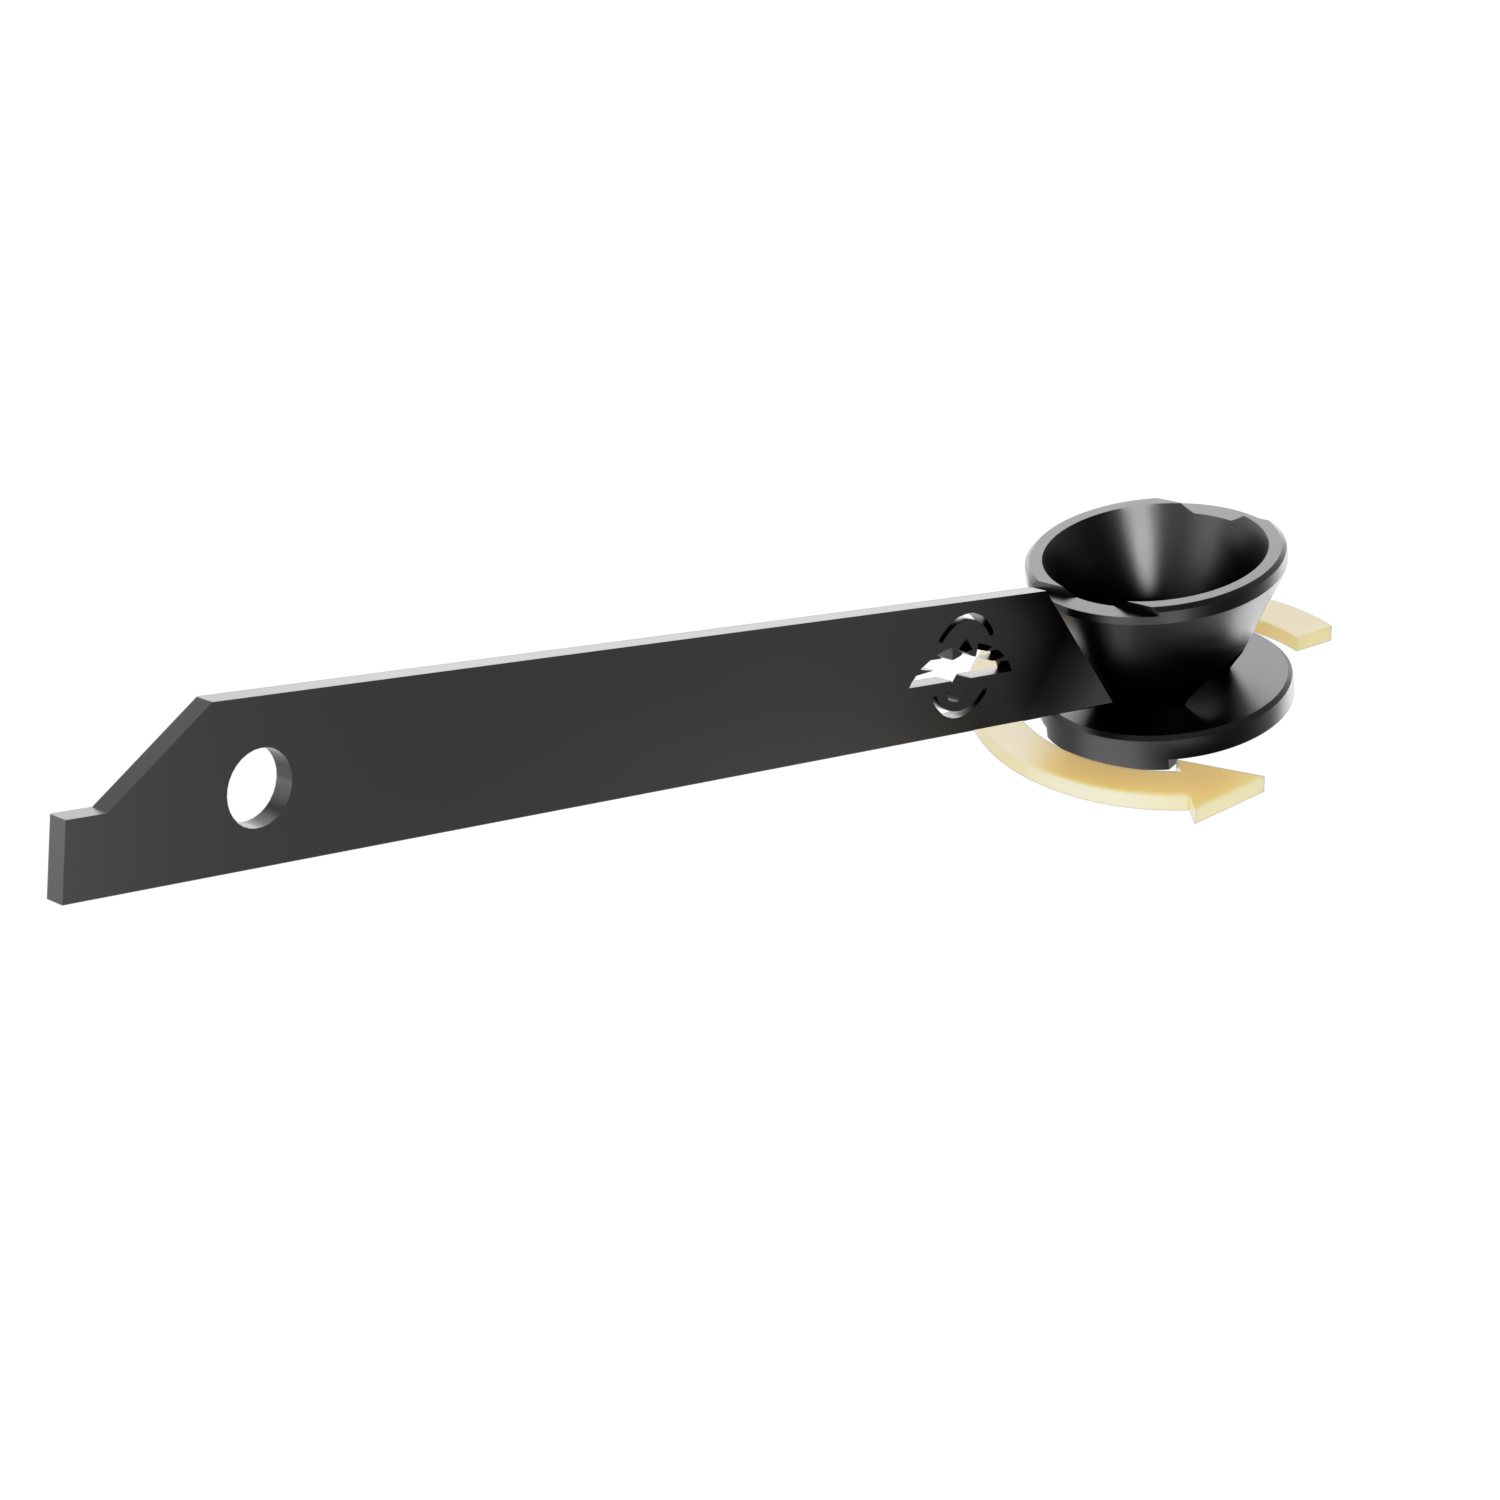
Silencer disassembly procedure
The silencer may only be disassembled after it has been removed from the firearm!
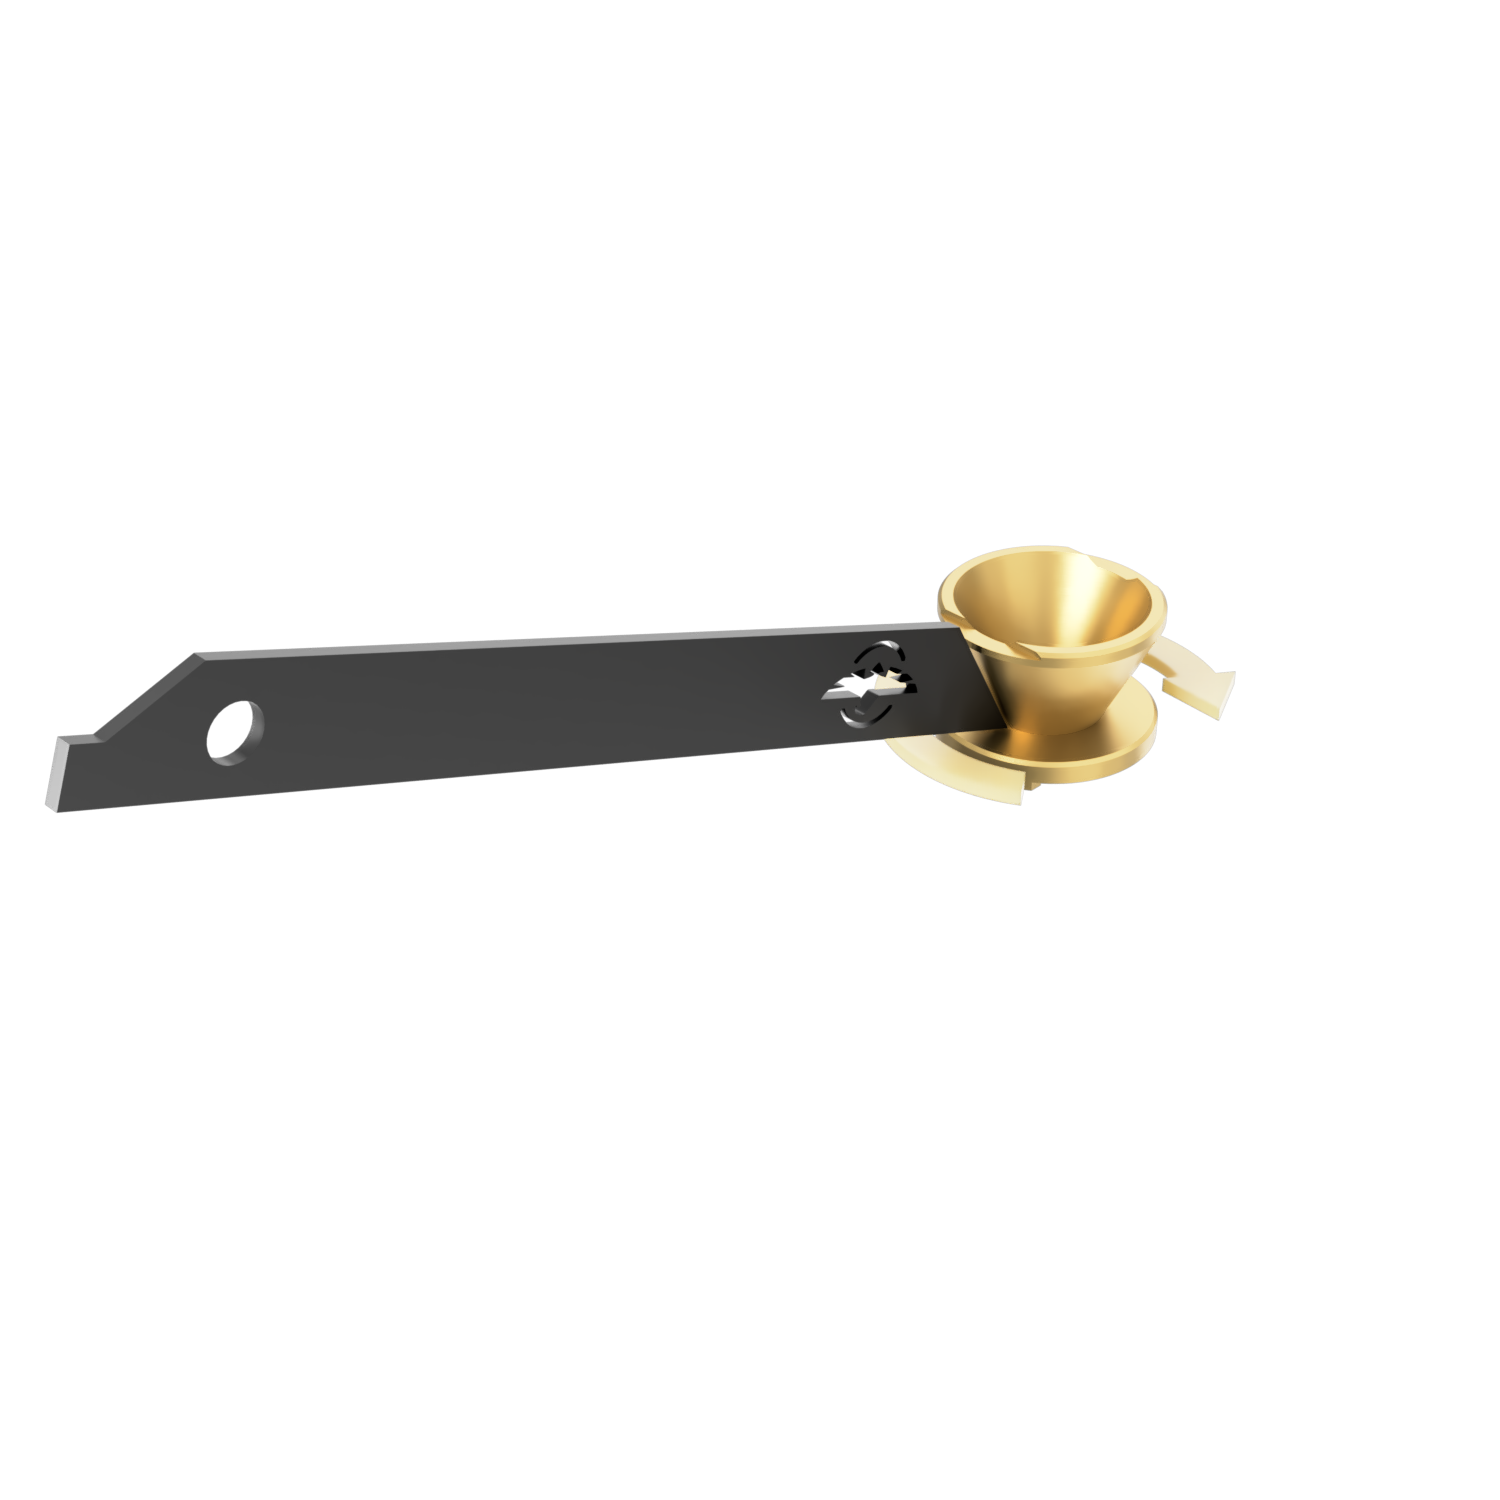
First, loosen the front face of the silencer with the enclosed wrench. Subsequently, it is possible to push the damping baffles out of the silencer body. In case of heavy pollution, it is possible to extrude the baffles by using a rod made of a soft material (wood, plastic, aluminum).
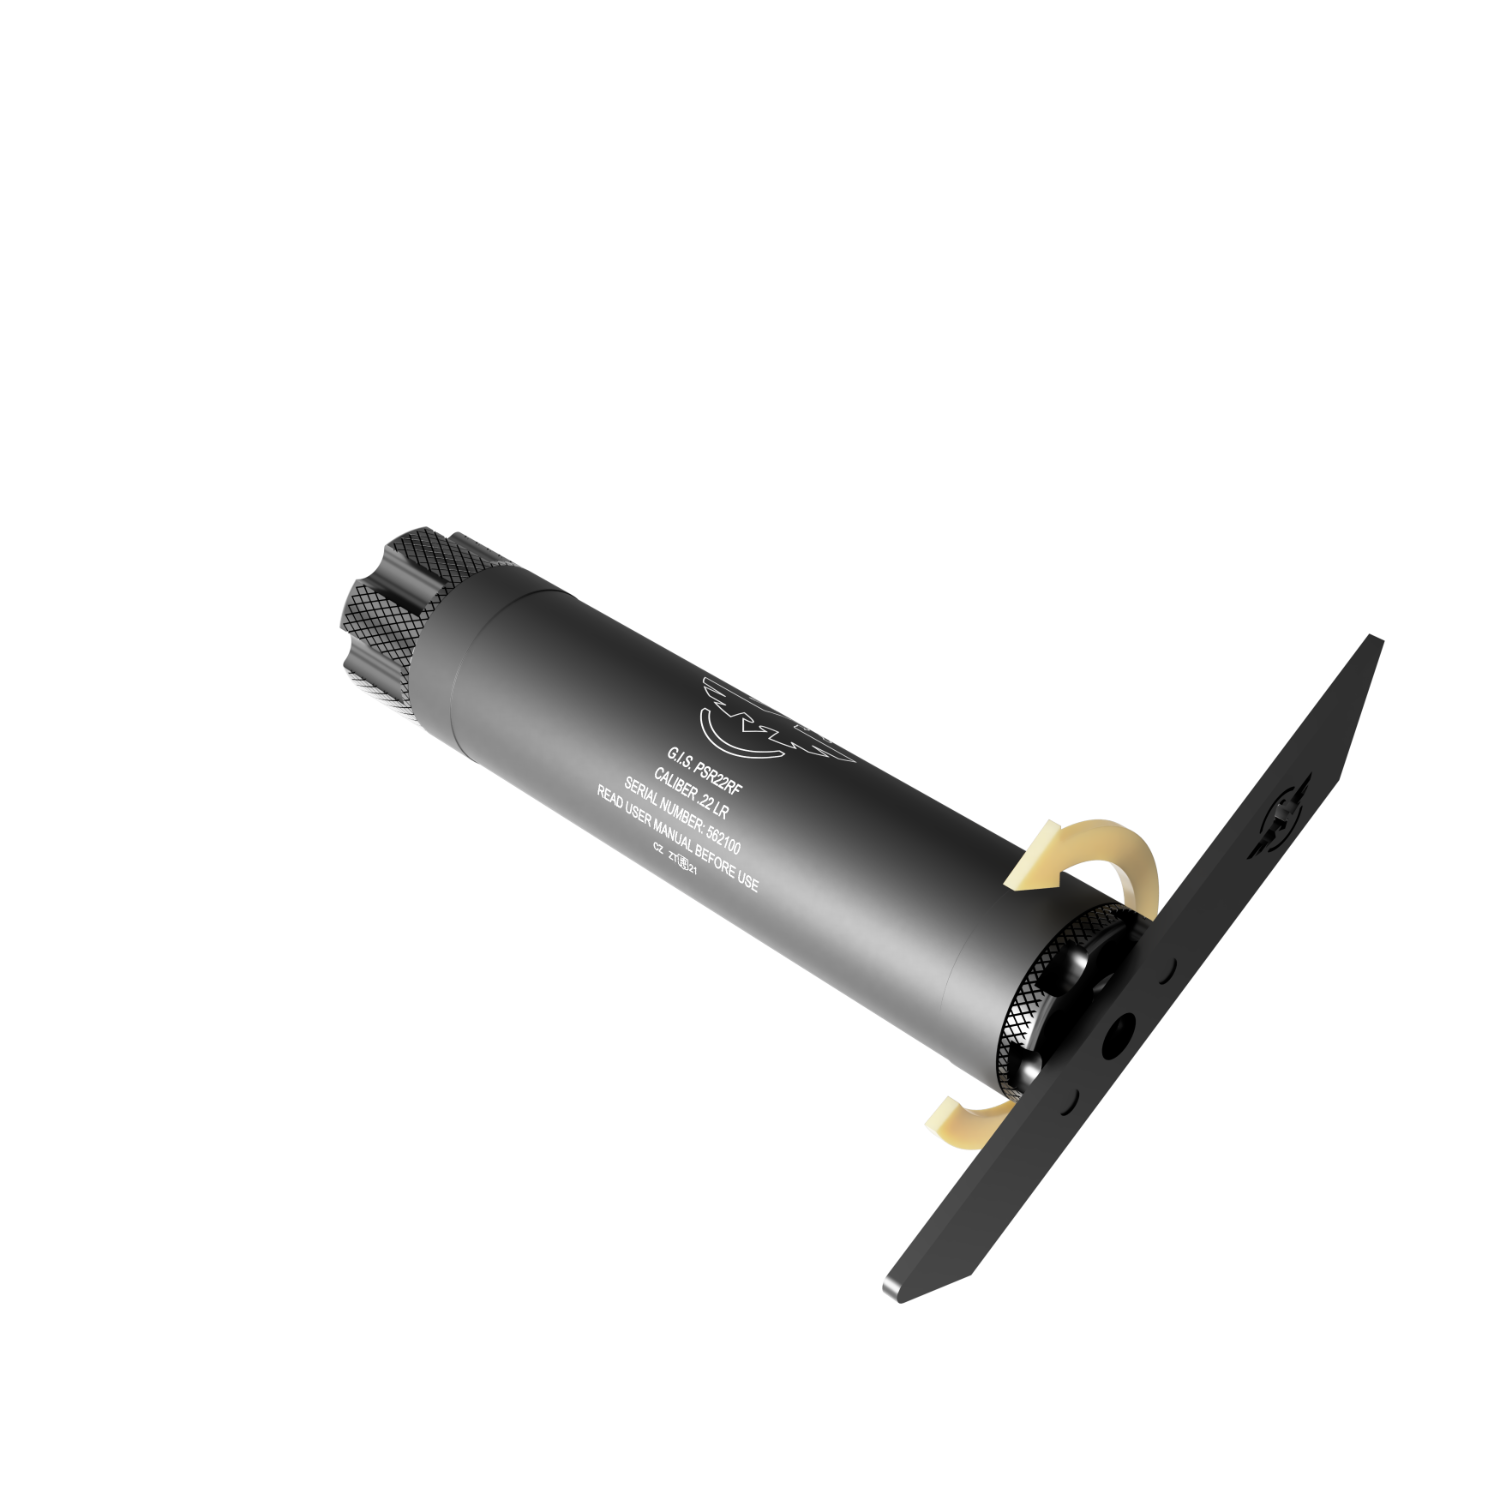
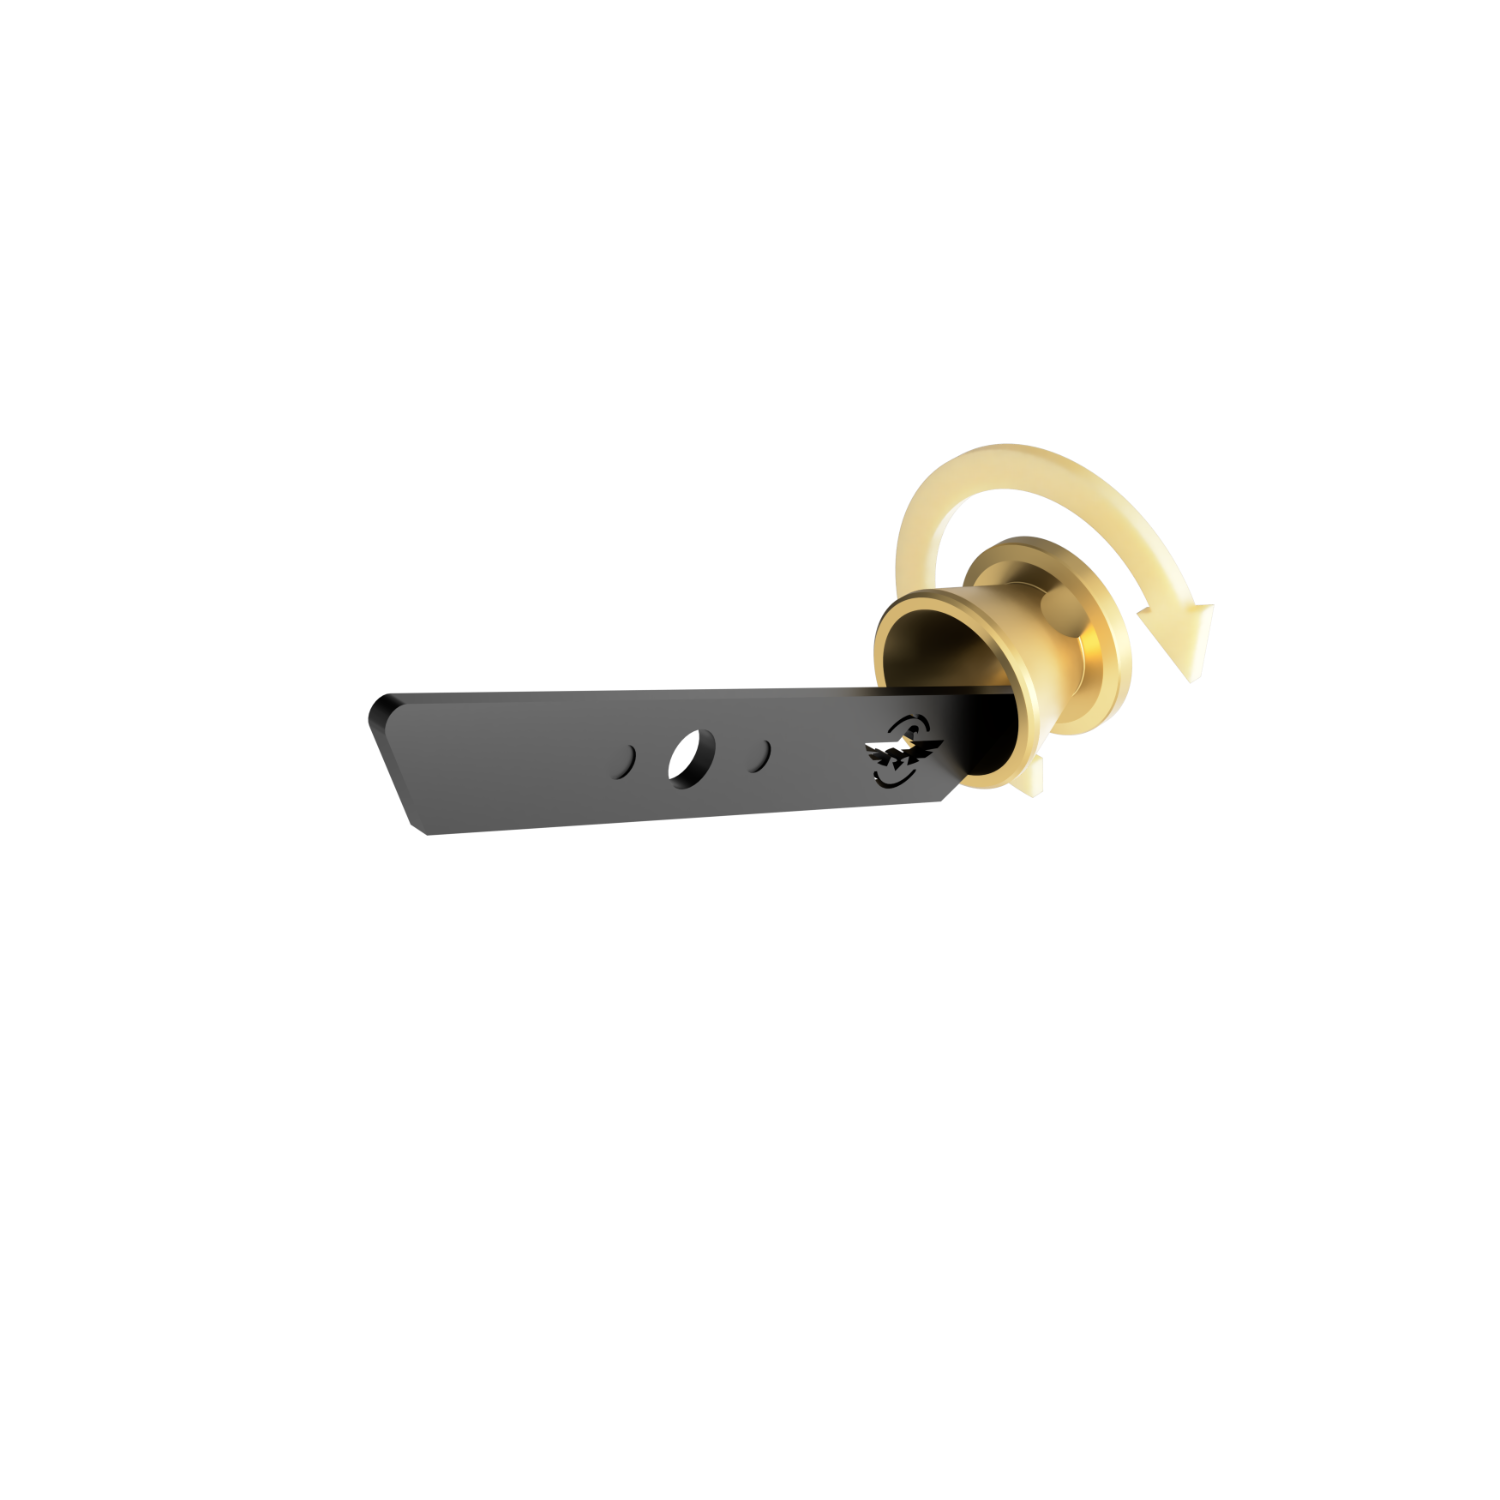
Reassembly of the silencer
The reassembly of the damper takes place in the reverse order, see picture “assembly of the silencer”.
The front and back faces of the silencer must be properly tightened when it is used, as it holds the silencer baffles in the correct position to ensure the integrity of the entire silencer.
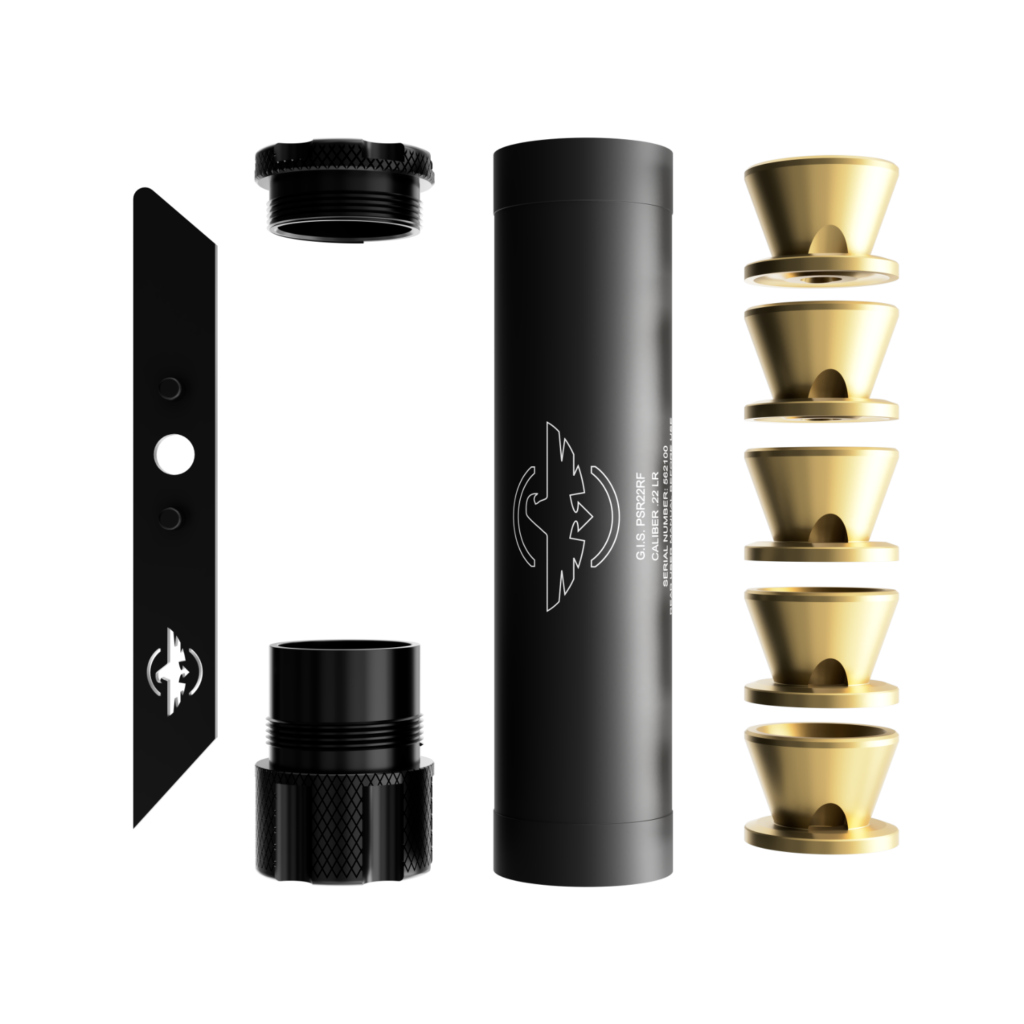
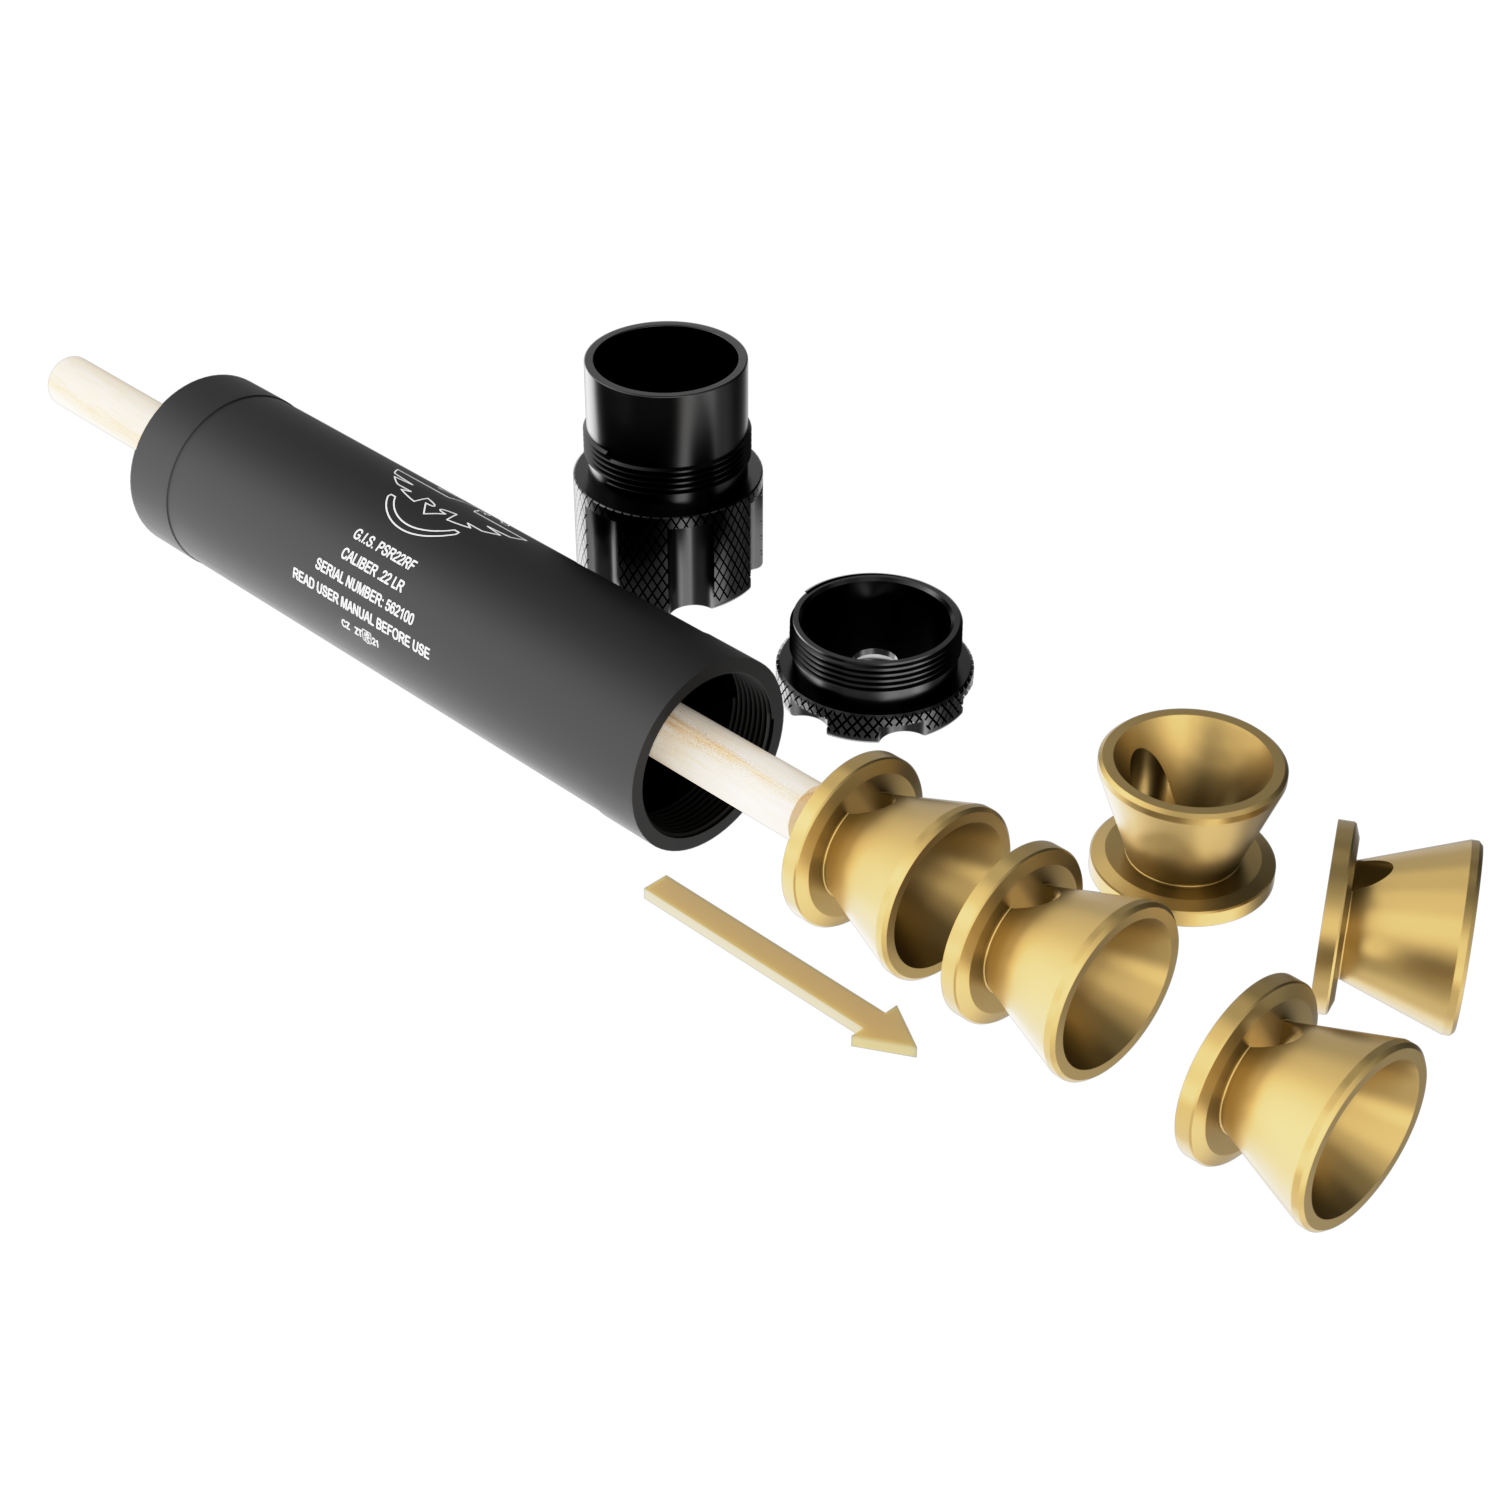
Silencer body
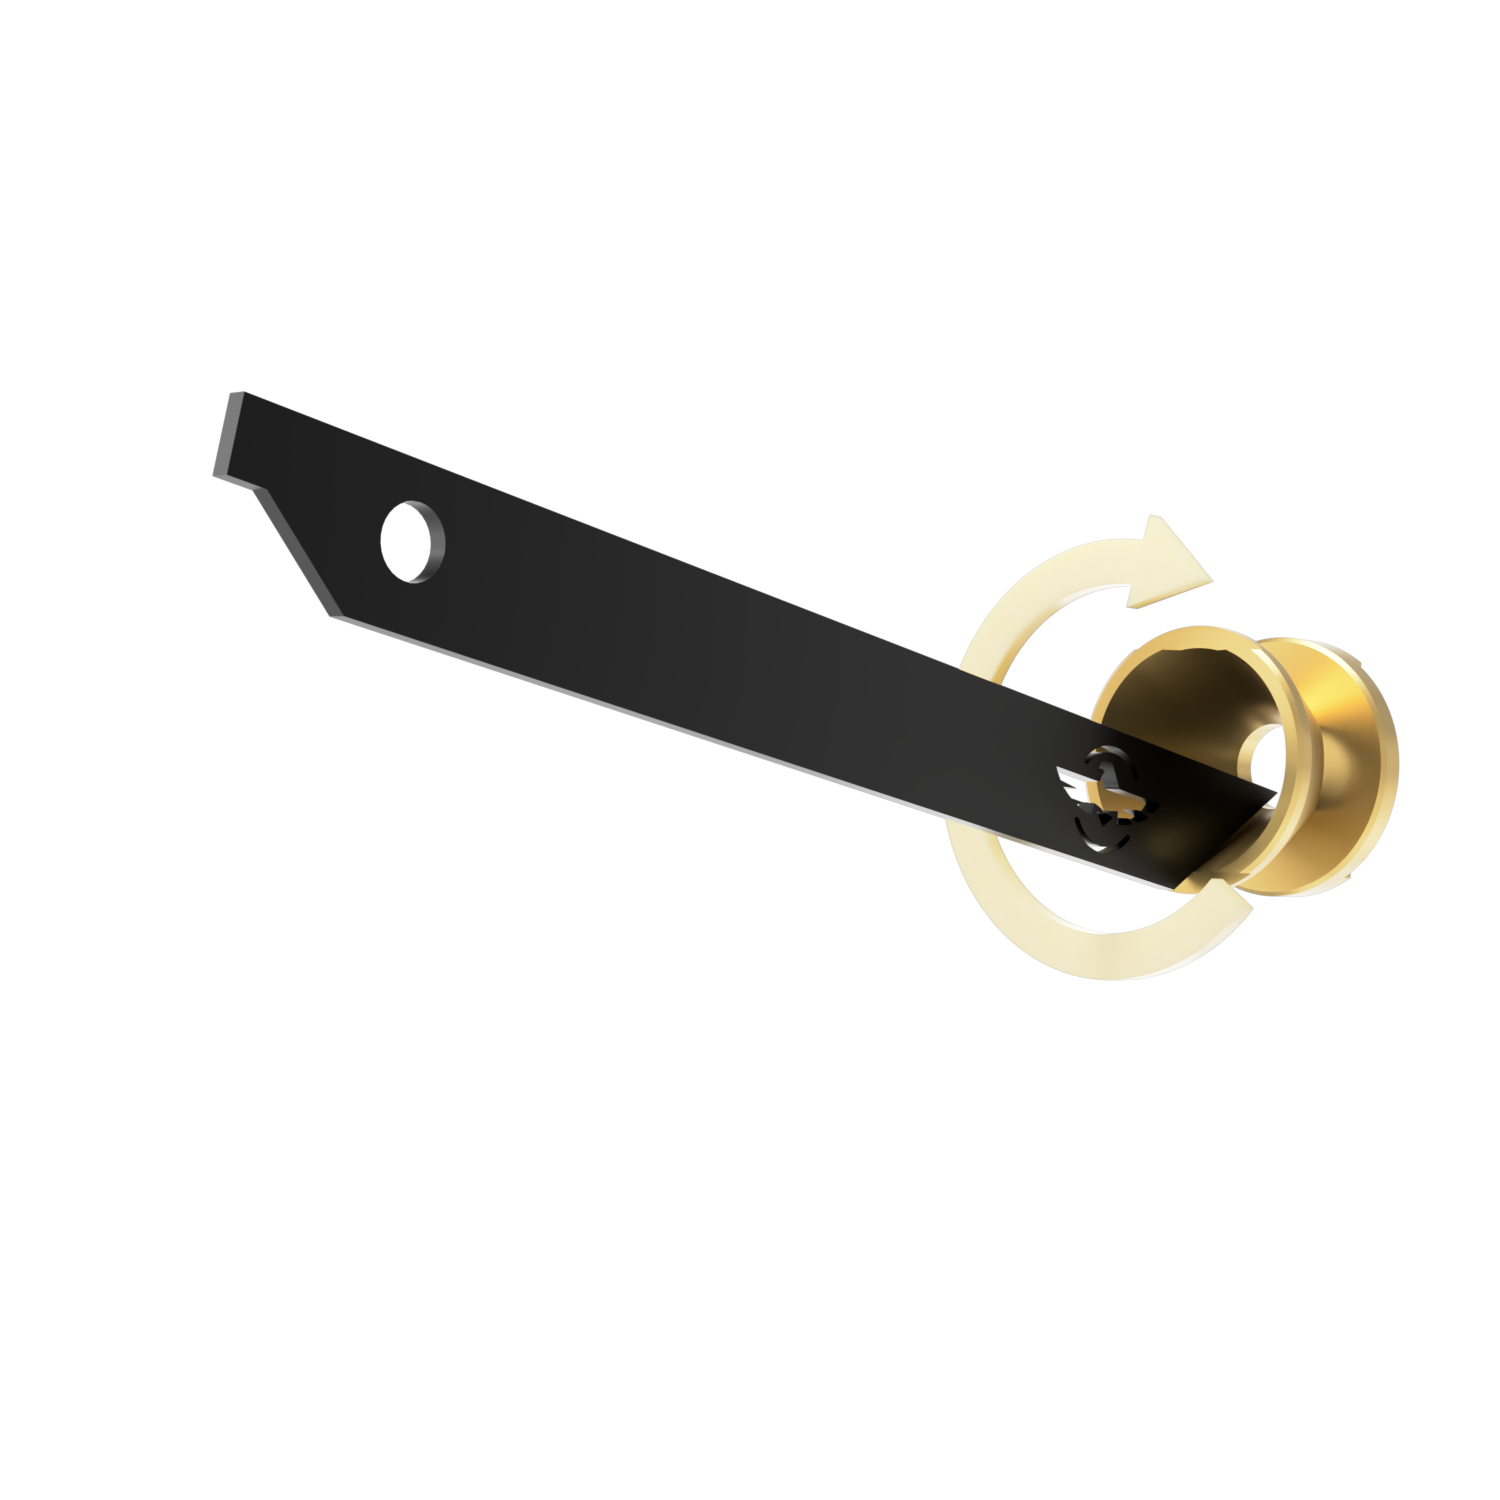
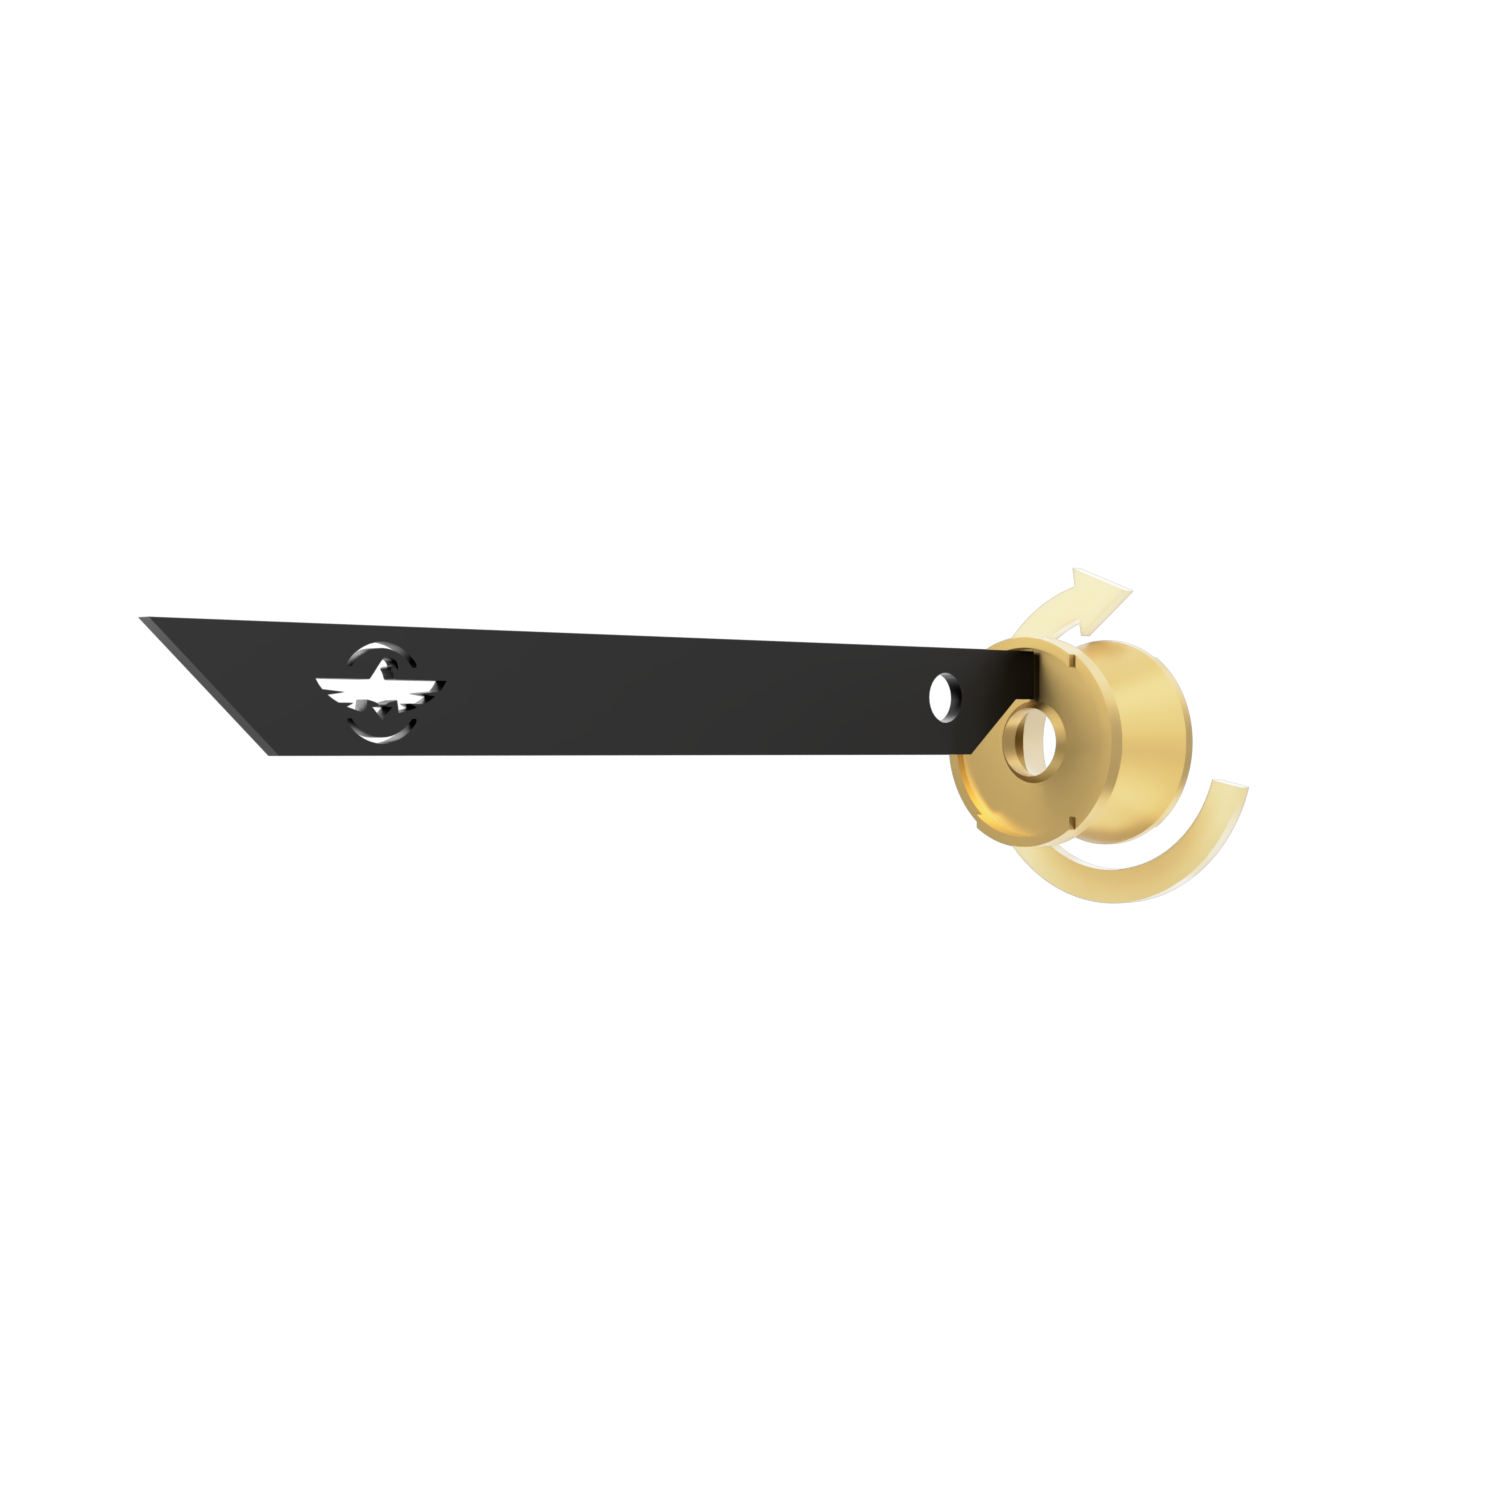
Cleaning & disassembly tool
Front cap
Rear cap
Baffles
Silencer cleaning process
The internal components of the silencer are intensively clogged with combustion products during firing, and therefore it is necessary to clean the silencer after firing up to 500 shots. The more often is the silencer cleaned, the easier its cleaning becomes. The manu- facturer therefore recommends cleaning the silencer after each use. Only in this way is it possible to guarantee its maximum efficiency and reliability of the weapon-silencer system. Do not use sharp tools when cleaning, as they may damage the surface protection of its components. It is advisable to use cleaning agents which dissolve combustion particles.
ATTENTION! Never use volatile substances for cleaning. Their use can cause a malfunction of the silencer and endanger human health and life.
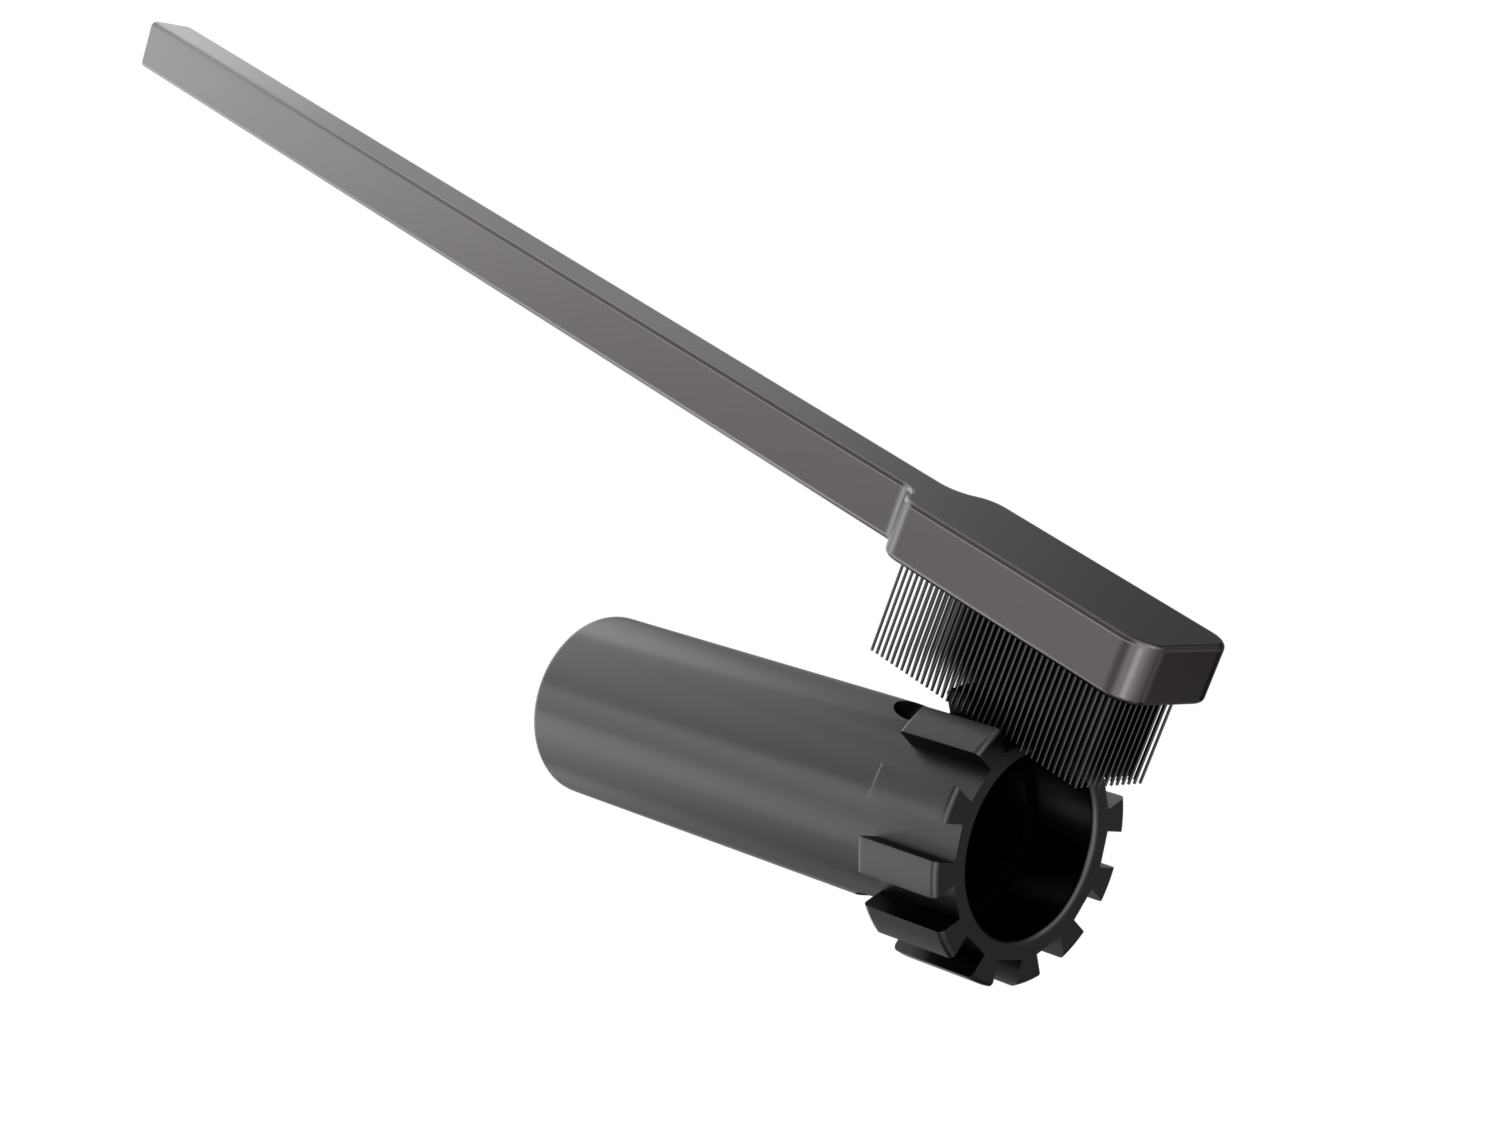
After several dozen shots, it is usually no longer possible to clean the silencer using only a cloth and detergent, but it is necessary to mechanically remove the layer of fume deposits on all internal parts of the silencer. It is therefore advisable to use a universal disassembly tool which is part of the PSR22RF package. A wire brush with softer wires can be used to clean screw-threads and less soiled parts.
Before reassembling the silencer, make sure that all threaded connections are clean. It of- ten happens that loose dirt gets into them during cleaning of other parts of the silencer. We recommend using round brass brushes for screw-thread cleaning (e.g., for barrel cleaning).
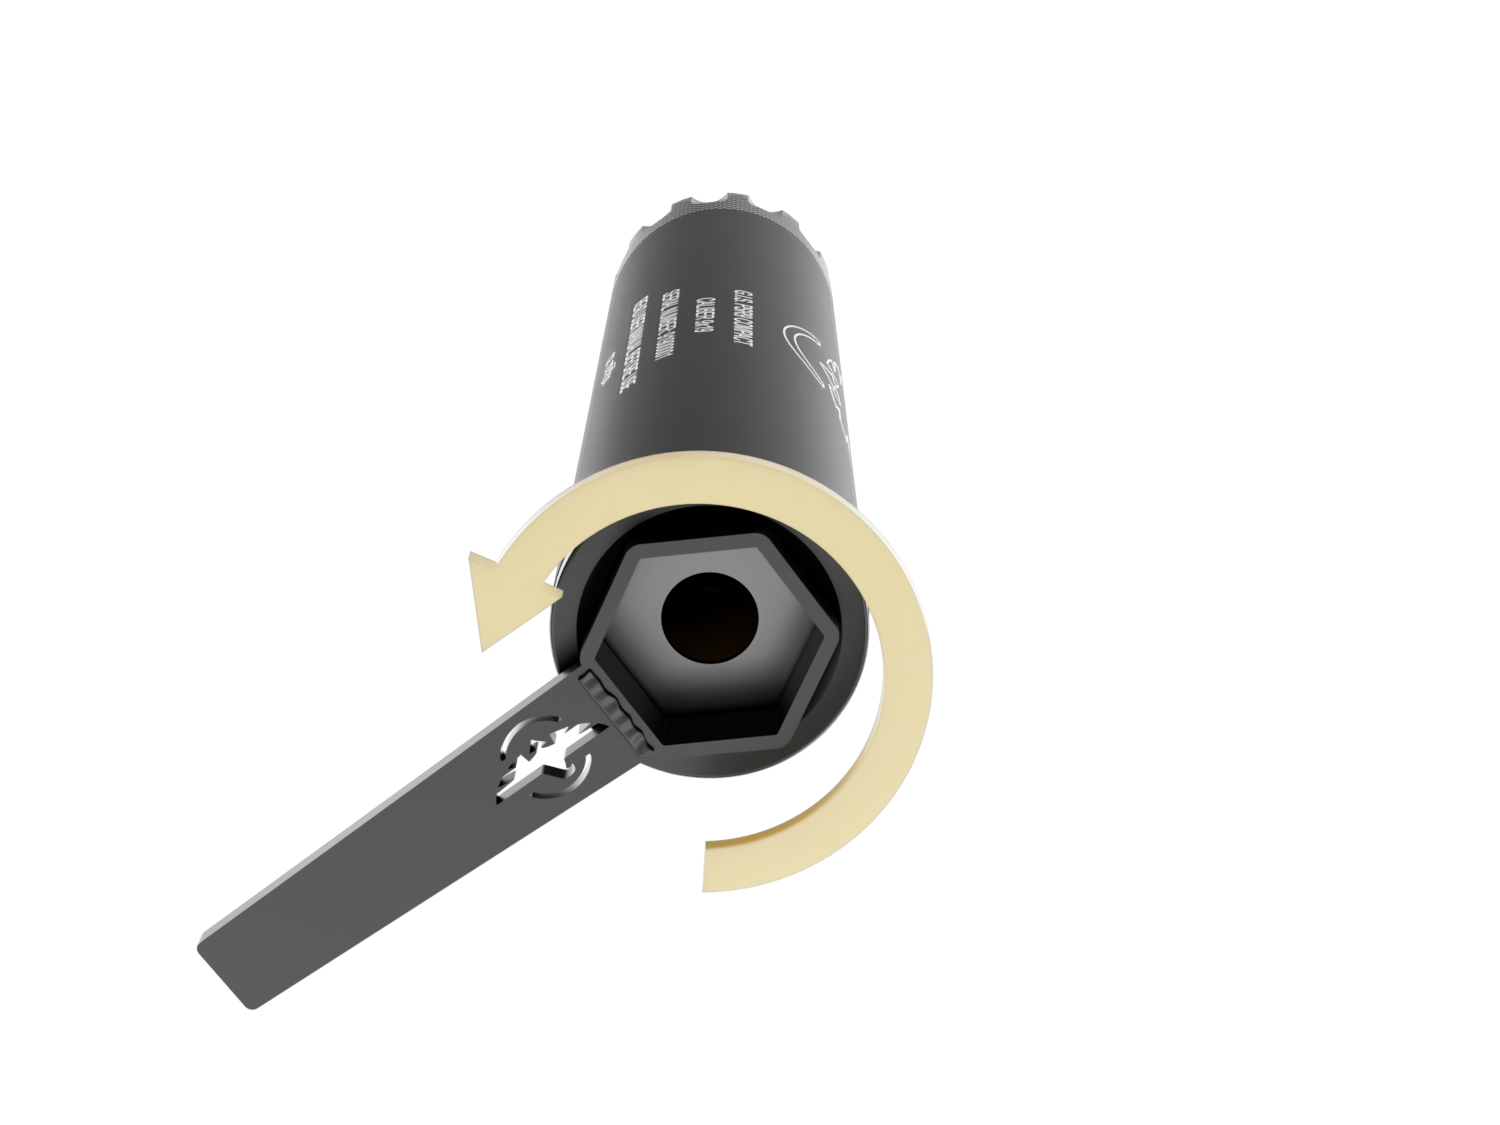
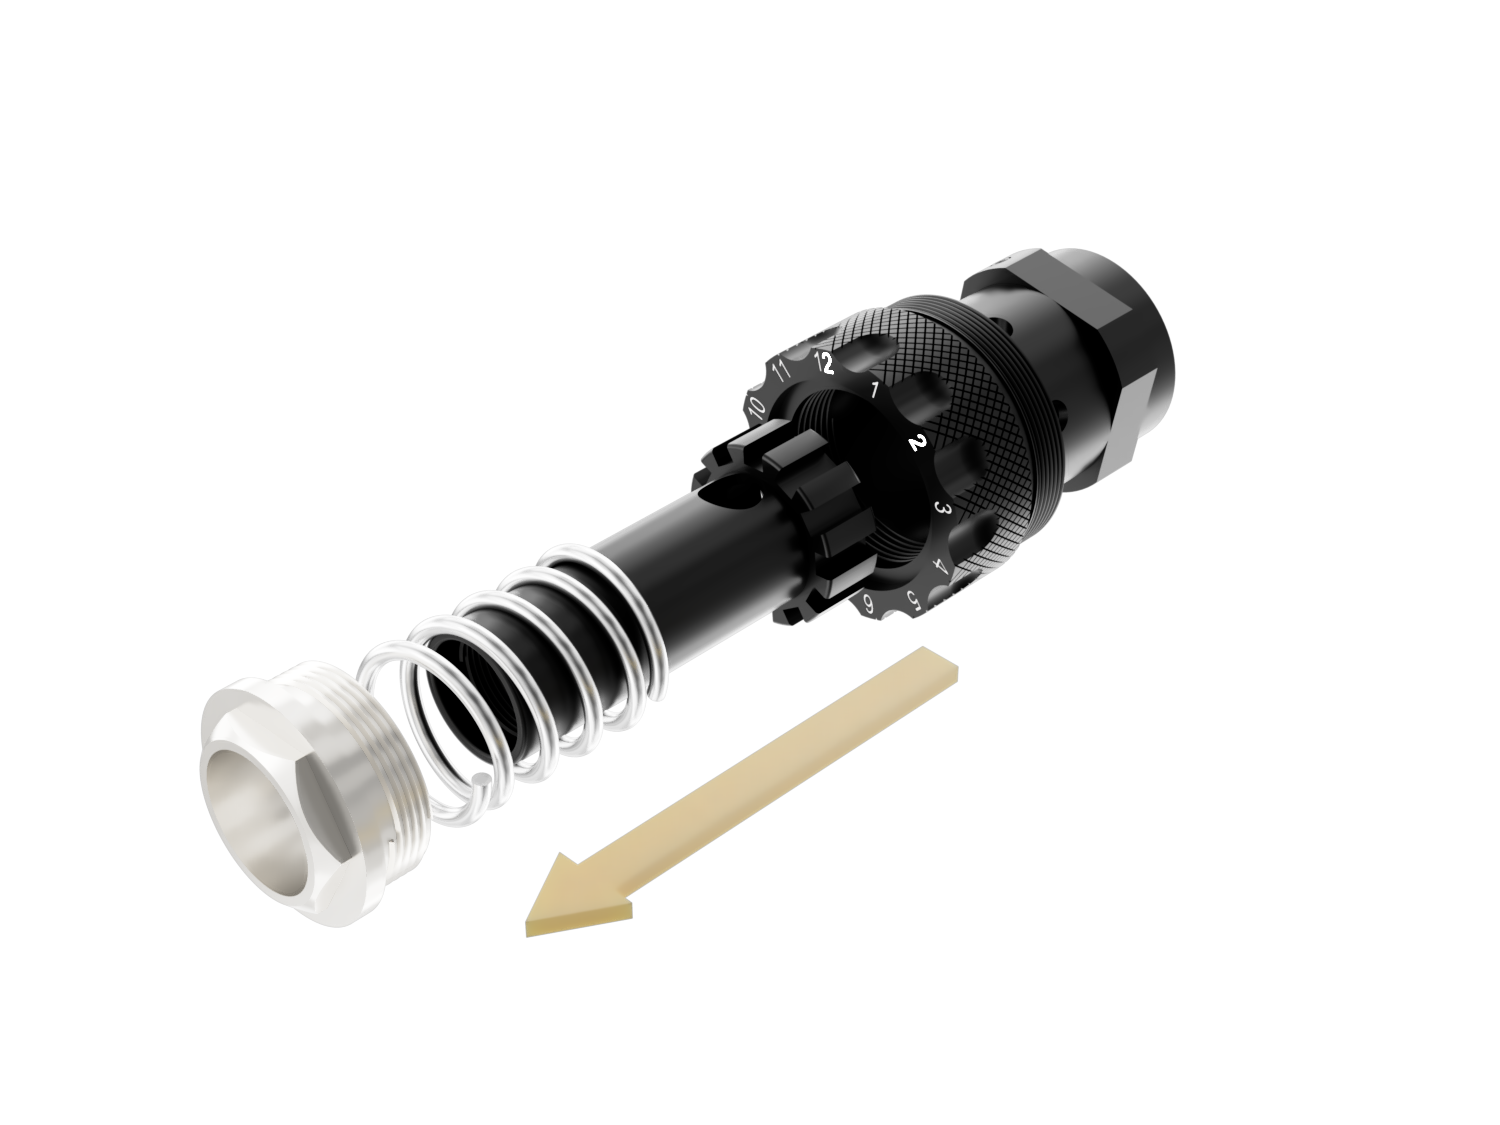
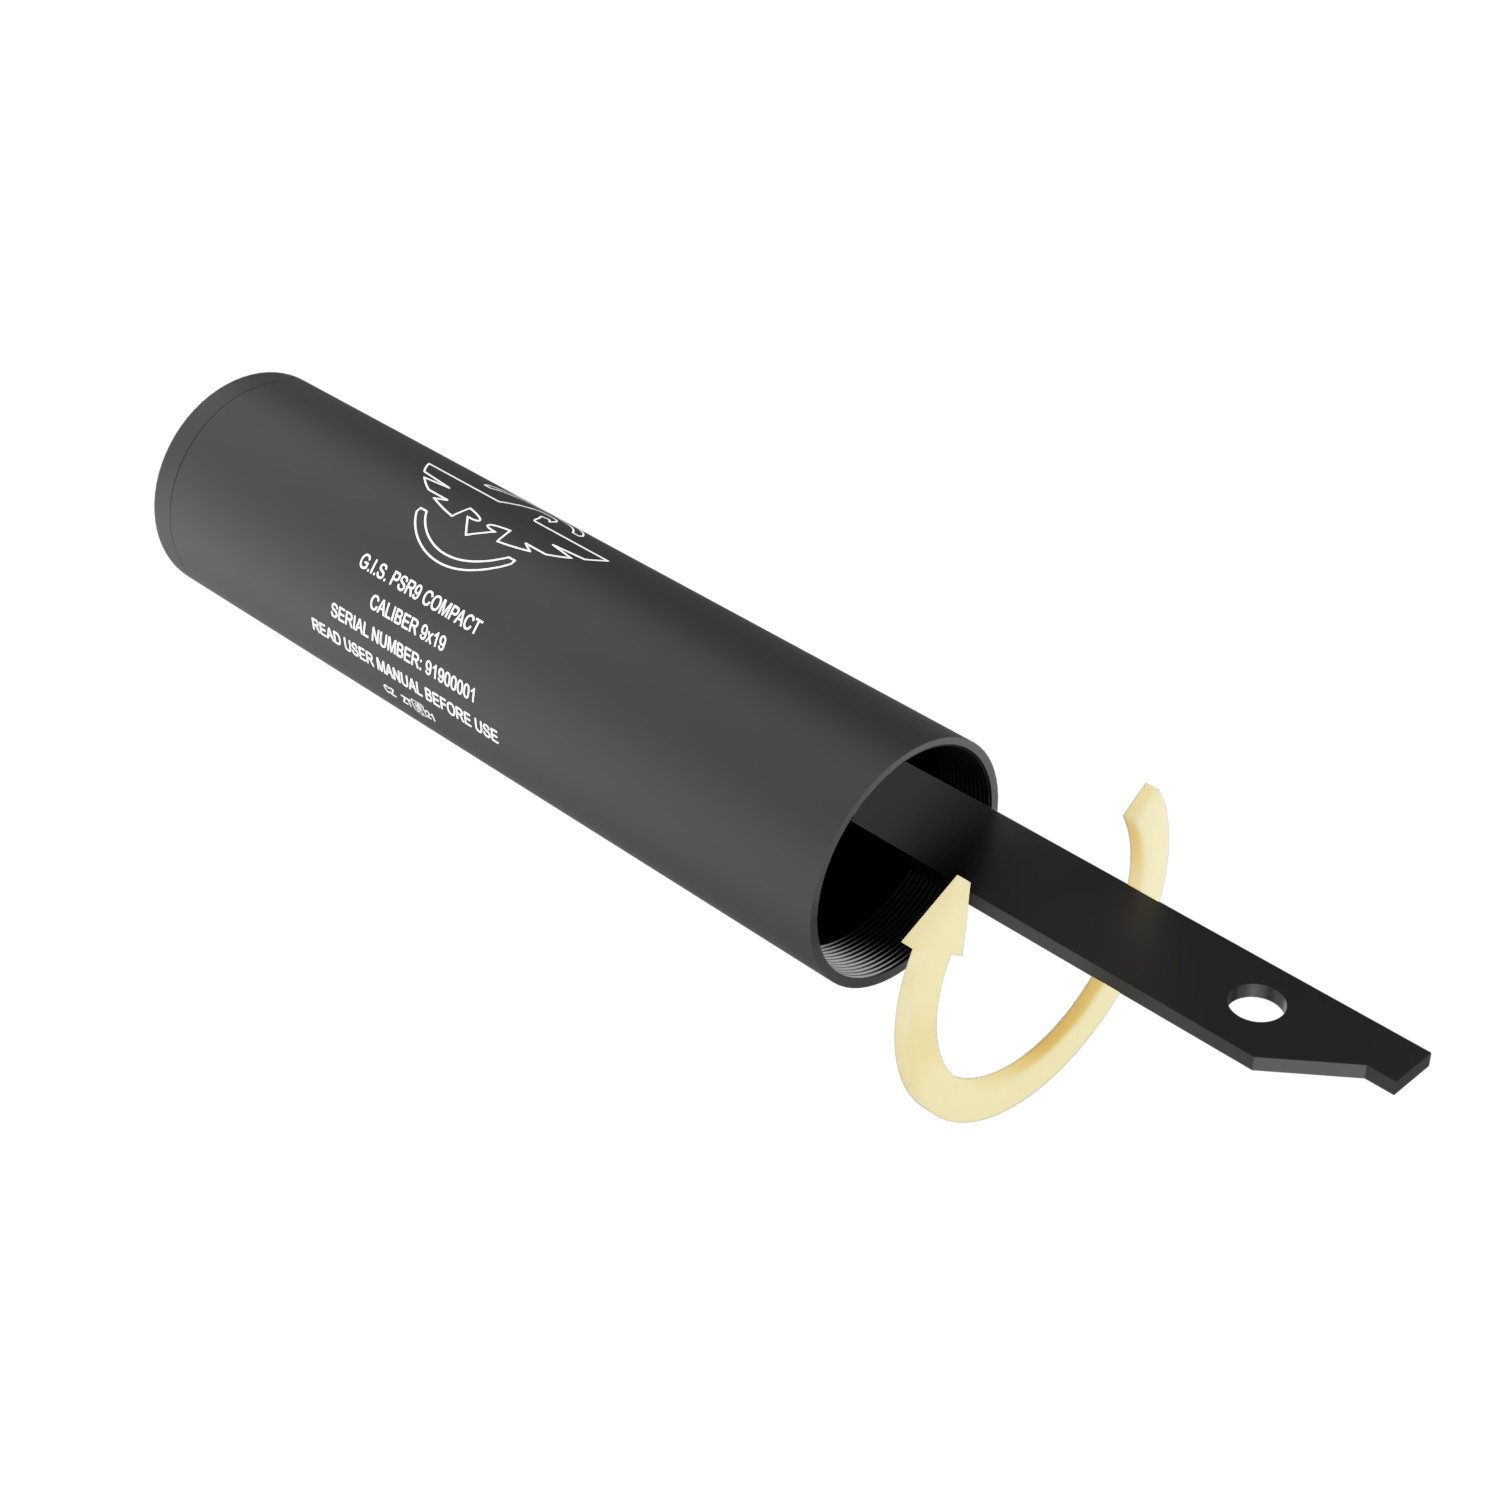
G.I.S. PSR9 (COMPACT & STANDARD)
Procedure for disassembling the silencer
The silencer may only be disassembled after it has been removed from the firearm!
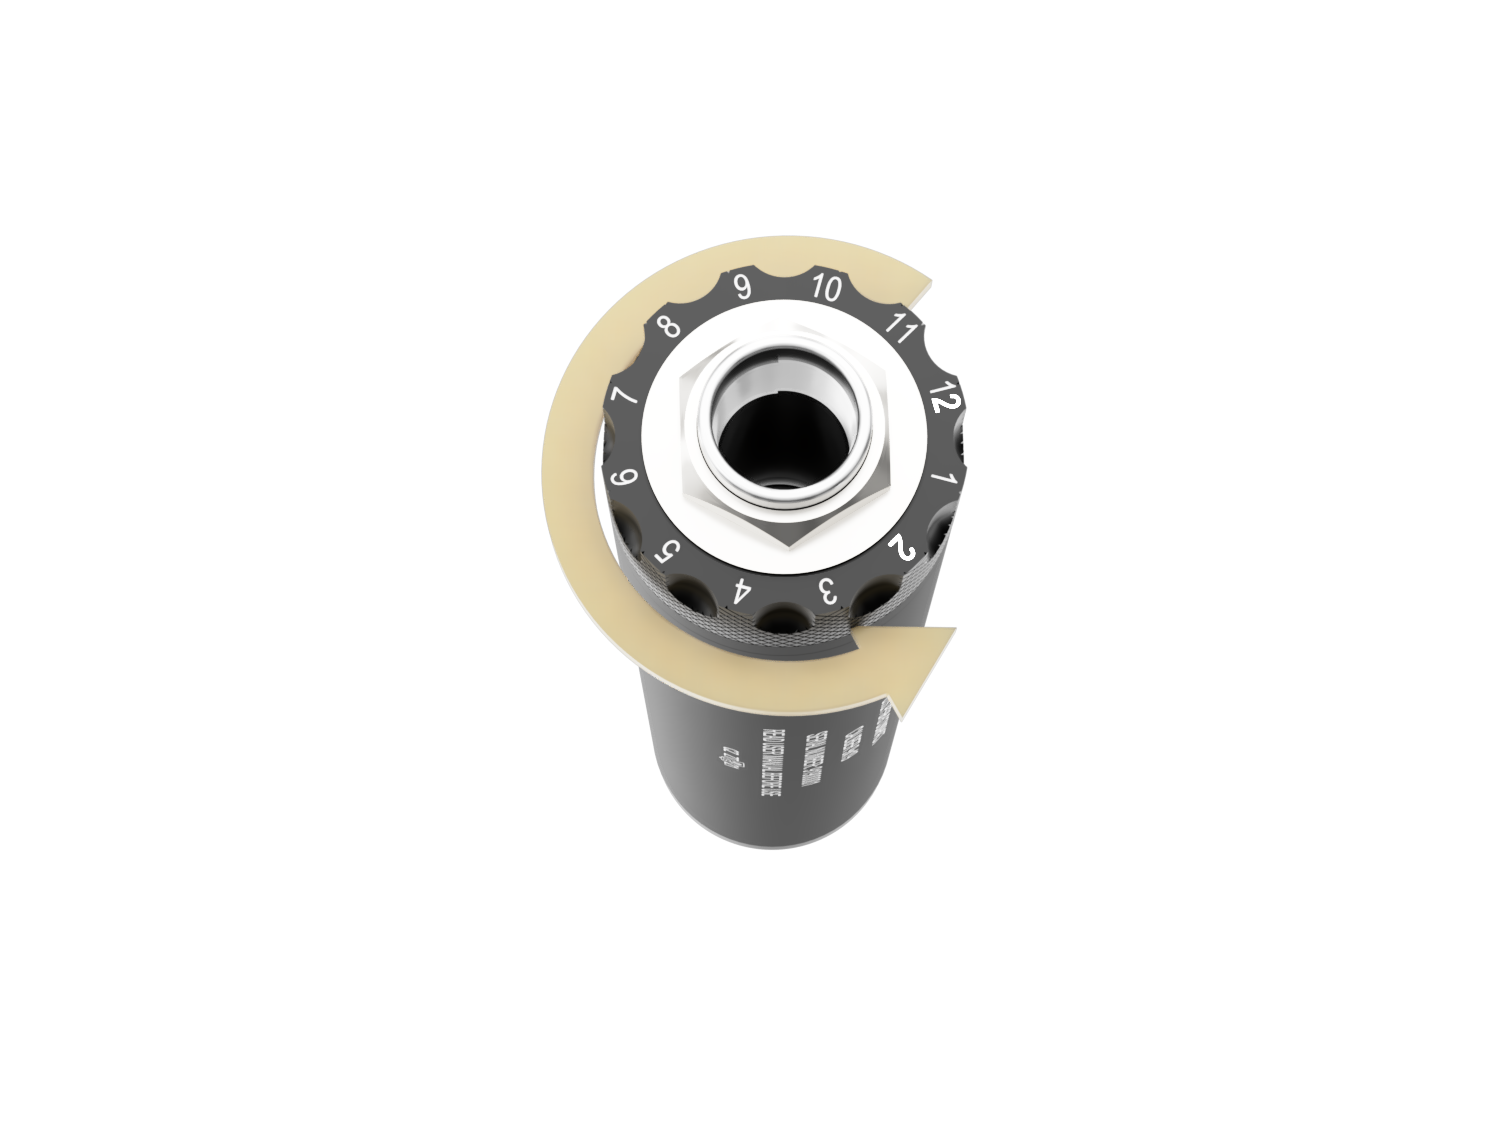
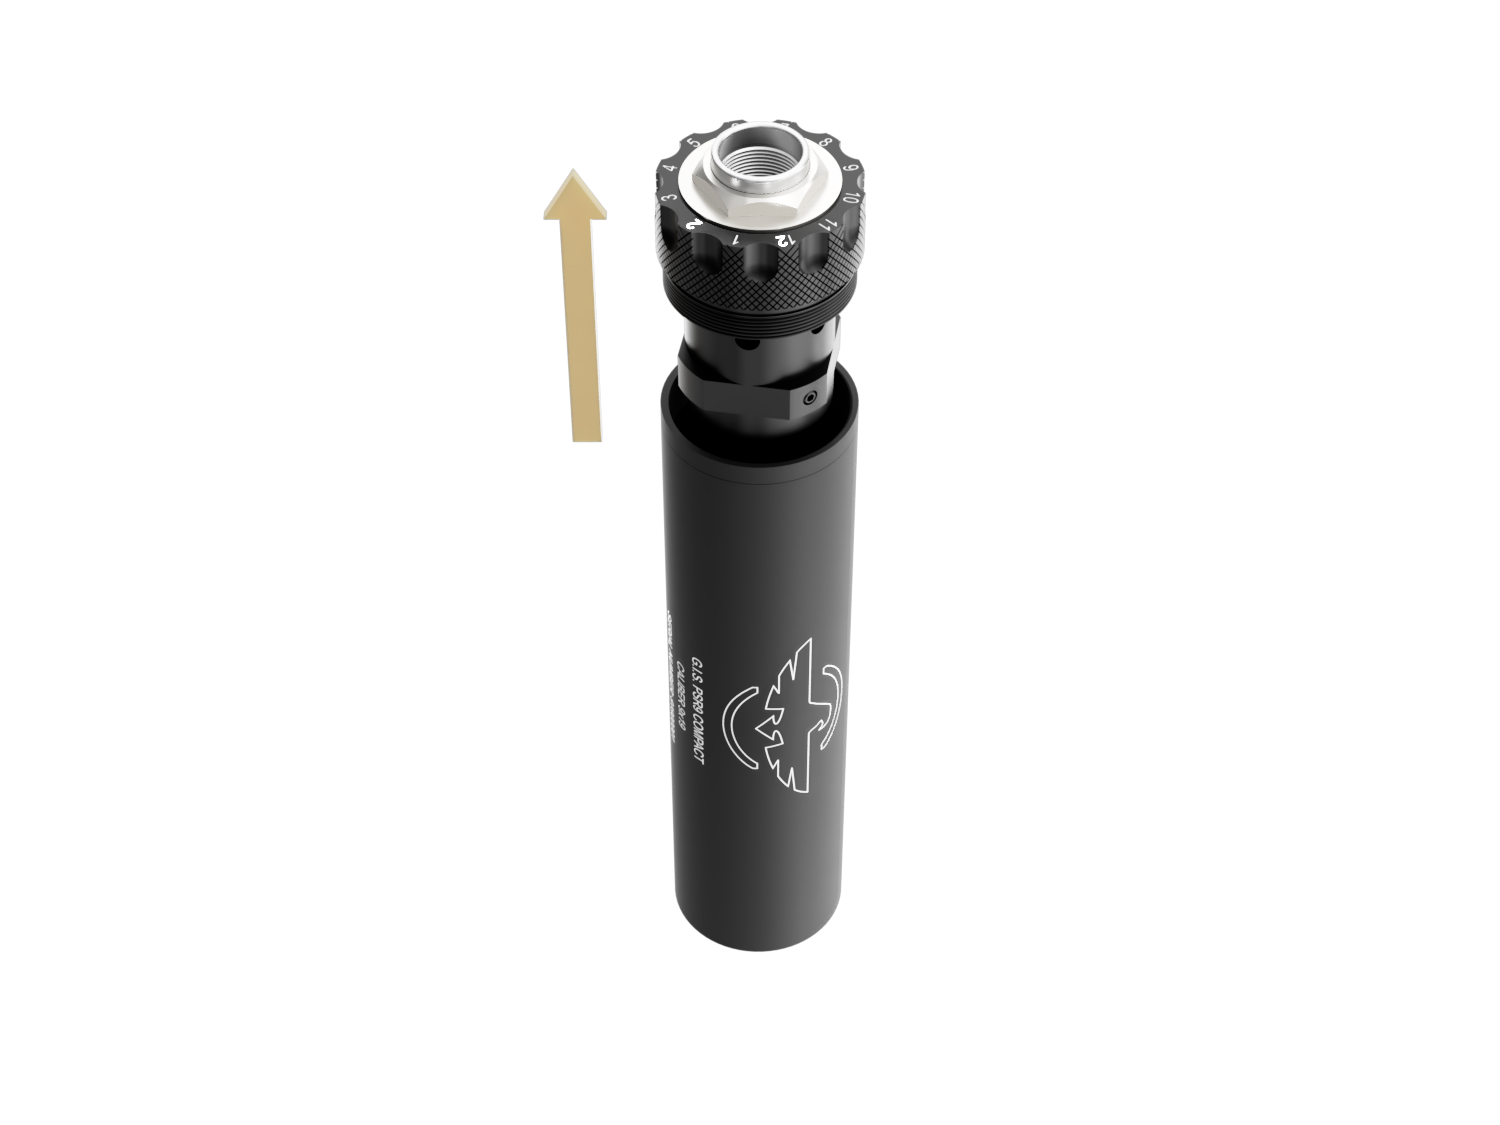
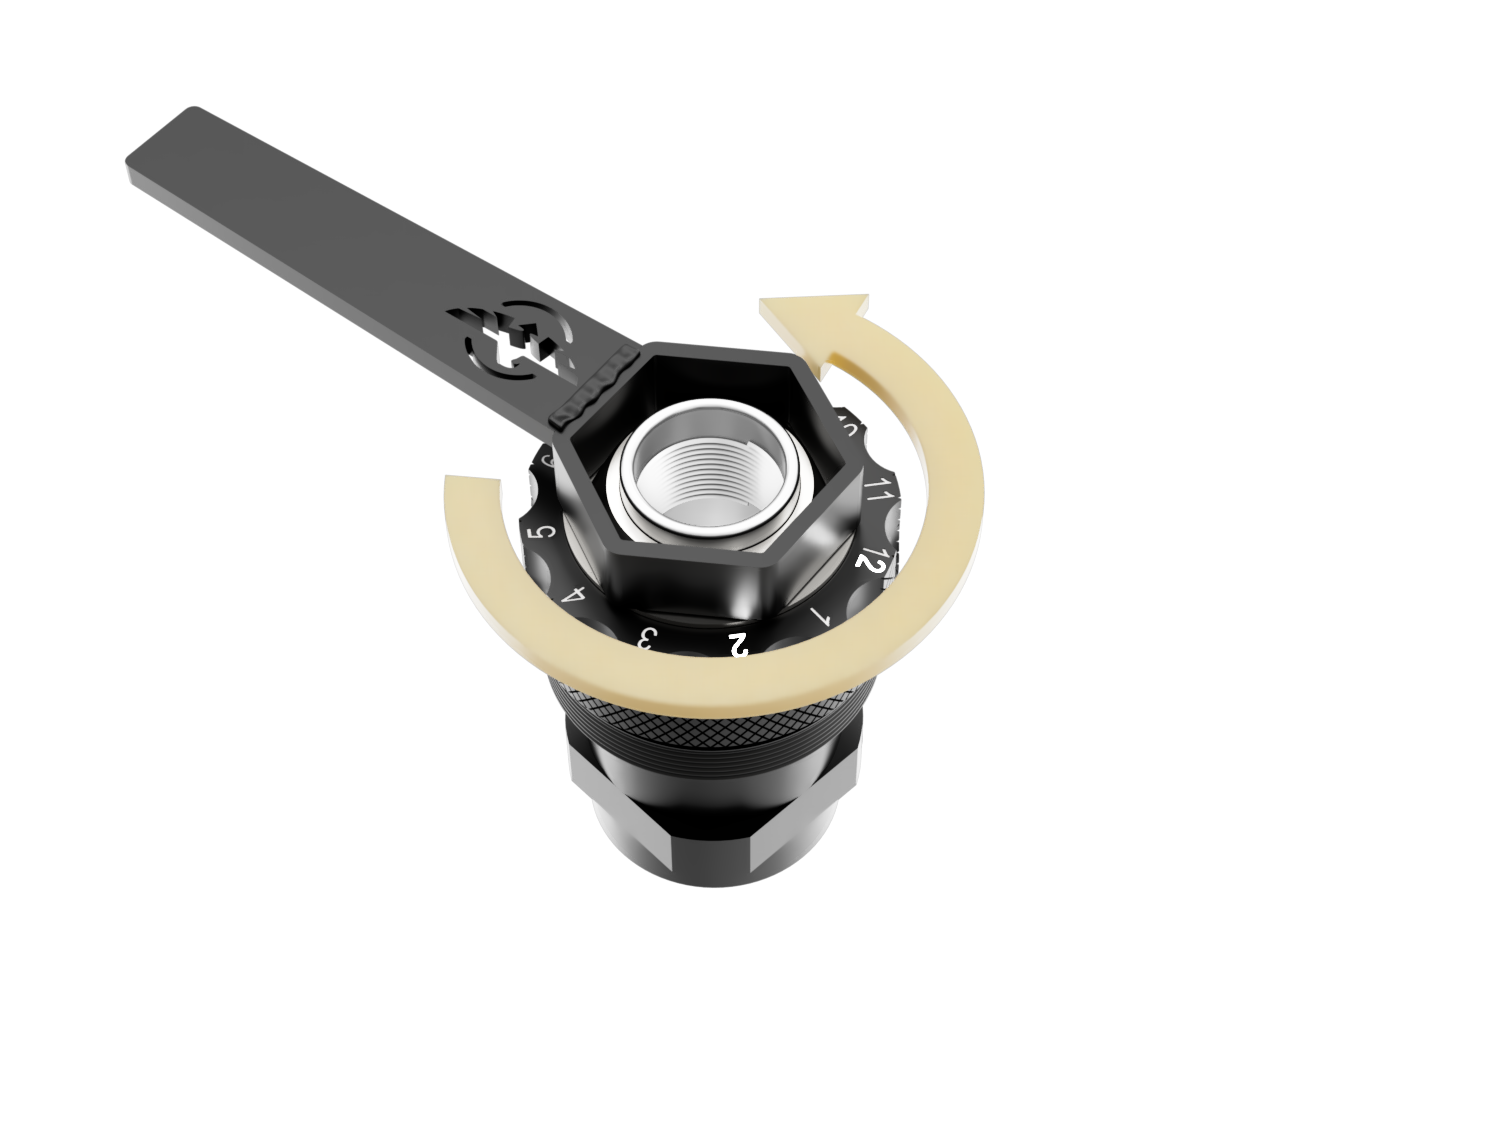
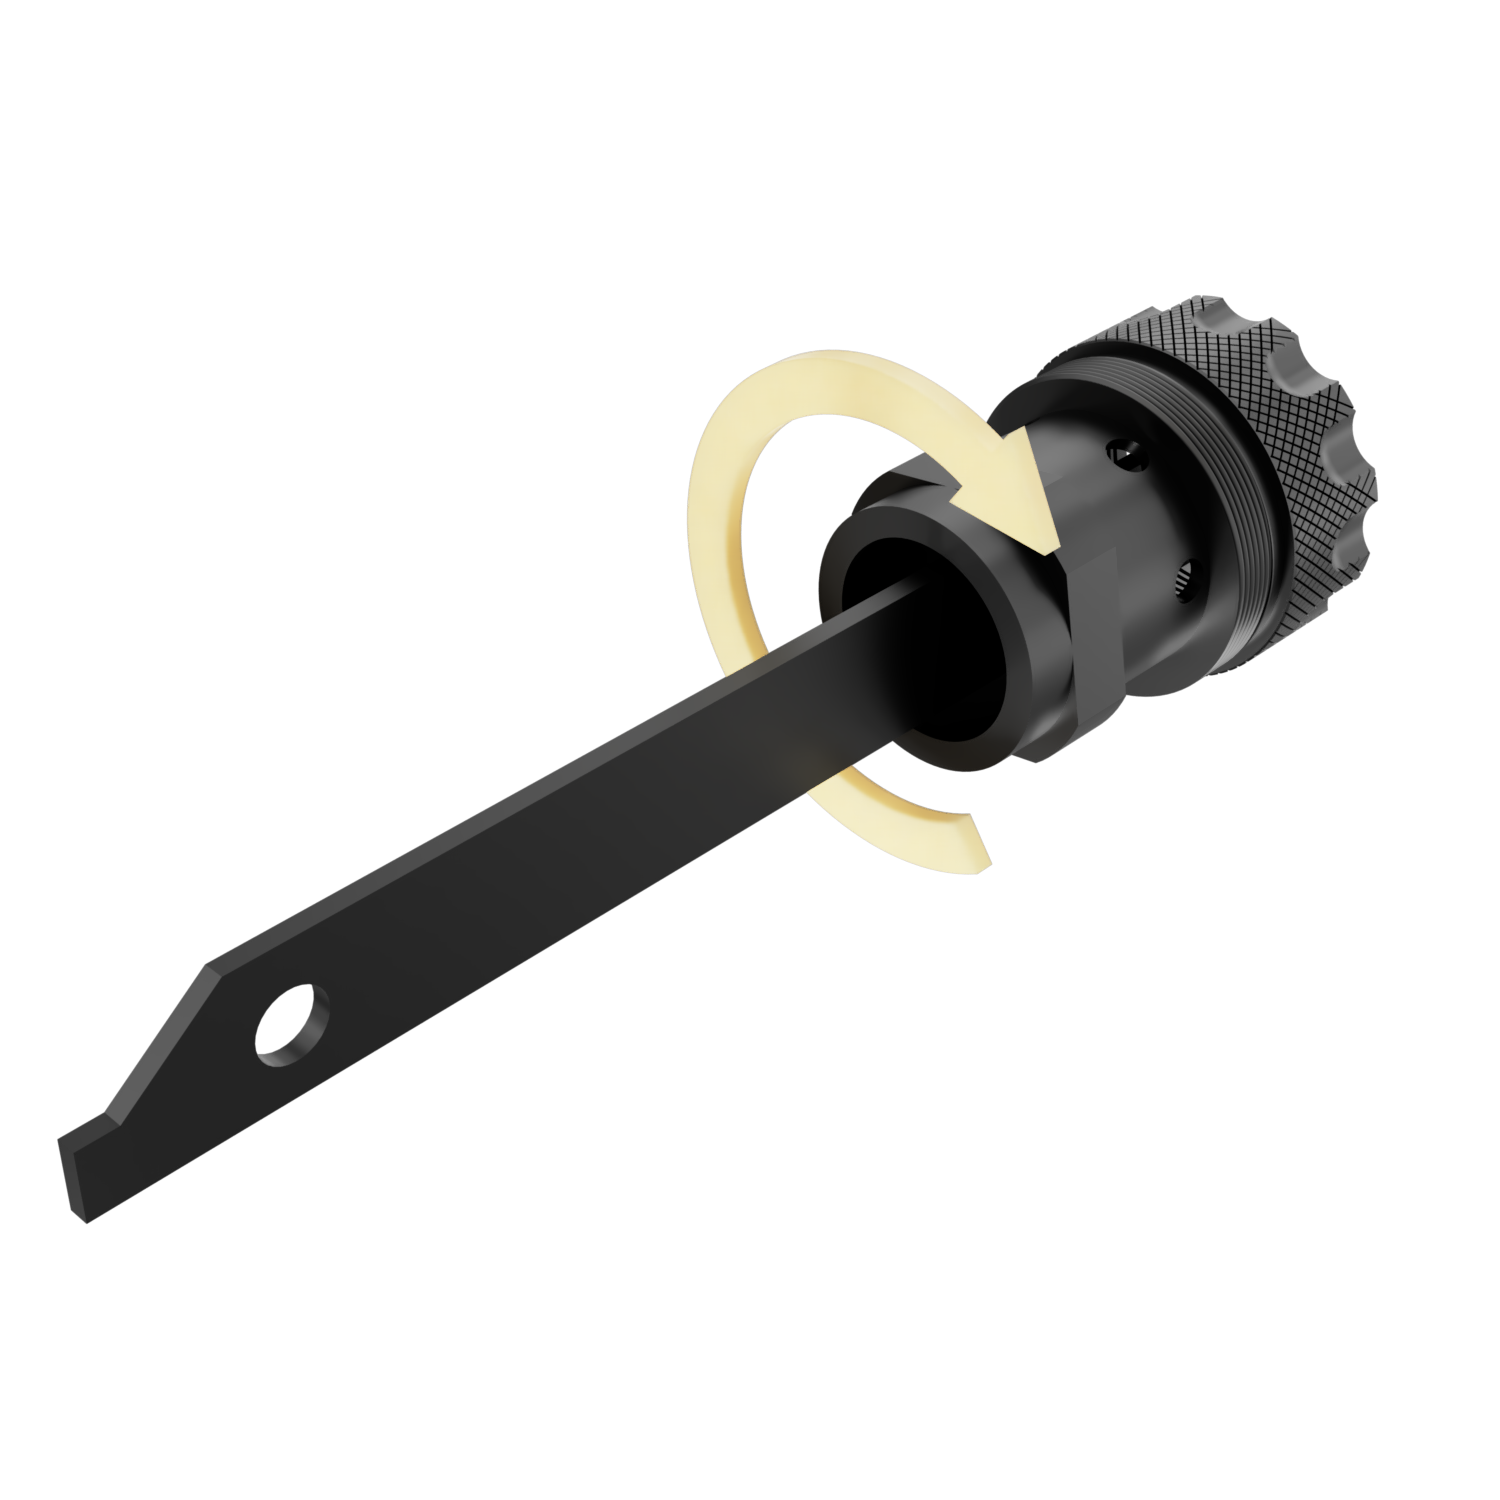
First, use the supplied wrench to loosen and unscrew the front face of the silencer. Then unscrew the pulse amplifier assembly. Then, it is possible to push the sound-suppressing baffles out of the silencer body. If heavily soiled, the bafl es can be pushed out using a rod of soft material (wood, plastic, aluminum). Finally, use the supplied wrench to unscrew the rear face from the pulse amplifier body, and remove the amplifier piston together with its return spring.
Reassembling the silencer
Reassembly of the silencer must be conducted in the reverse order, just make sure that the expansion bafl e is inserted first (in the direction away from the amplifier body) (refer to the figure with “Description of silencer parts”).
The front face of the silencer must be properly tightened during use because it holds the sound-suppressing baffles in place, ensuring the integrity of the entire silencer assembly.
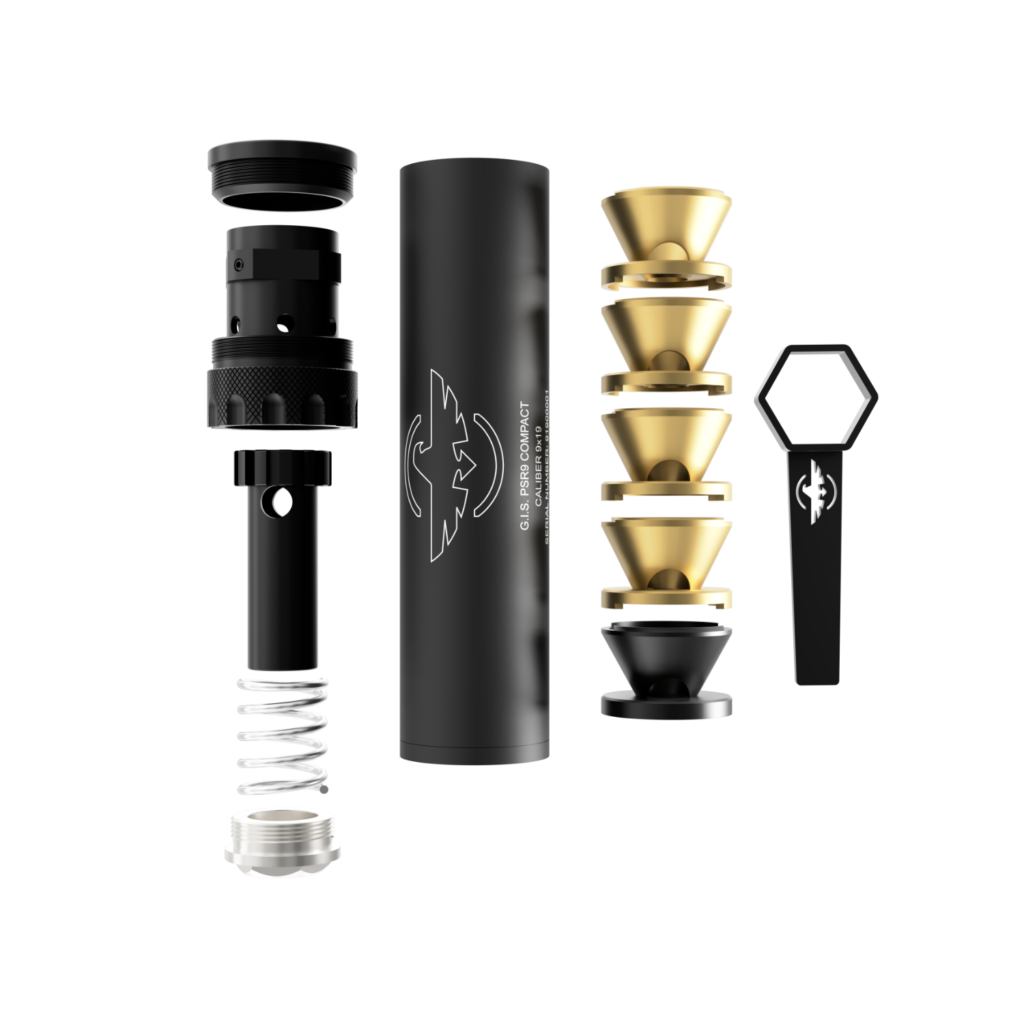
Silencer body
disassembly tool
Front cap
Pulse amplifier body
Baffles
Expansion baffle
Pulse amplifier piston
Pulse amplifier recoil spring
Rear body of pulse amplifier
Silencer cleaning process
During firing, the inner parts of the silencer become heavily fouled with combustion gases and, therefore, it is necessary to clean the silencer maximum after firing every 250 rounds. The more often the silencer is cleaned, the easier the cleaning process is. The manufacturer therefore recommends cleaning the silencer after each use. This is the only way to guarantee maximum efficiency and reliability of the gun-silencer system.
Avoid using sharp tools for cleaning as they could damage the surface finish of the silencer parts. It is advisable to use cleaning agents that dissolve combustion products.
ATTENTION! Never use volatile substances for cleaning. Their use can cause a malfunction of the silencer and endanger human health and life.
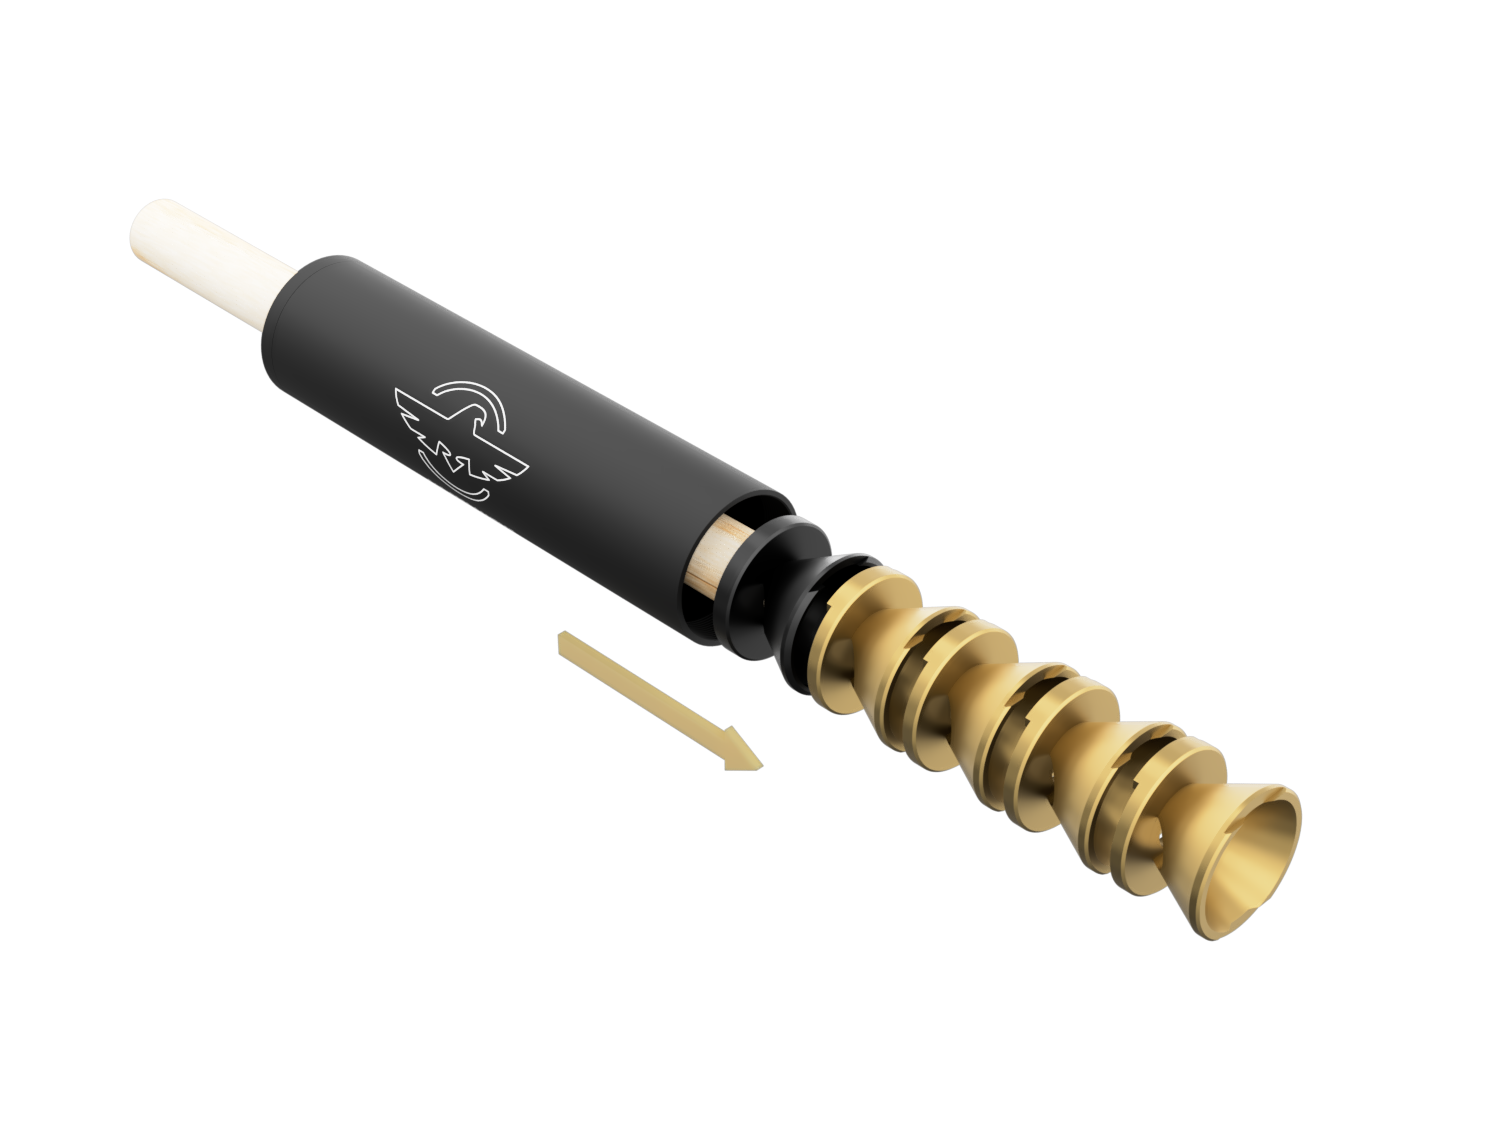
After firing several dozens of rounds, it is usually no longer possible to clean the silencer just using a cloth and a cleaning agent, and it requires mechanical removal of the layer of combustion products accumulated on all inner parts of the silencer. Therefore, it is advisable to use a suitable tool made of a hard material to remove this layer of fouling. For cleaning the inside of the silencer body and pulse amplifier, the optimized “GIS cleaning tool” is ideal. A wire brush with softer wires can be used for cleaning threads and less dirty parts.
It is extremely important to thoroughly clean all parts of the pulse amplifier. After cleaning, the amplifier piston must move freely in its body!!! If it is not the case, stoppages in firing may occur.
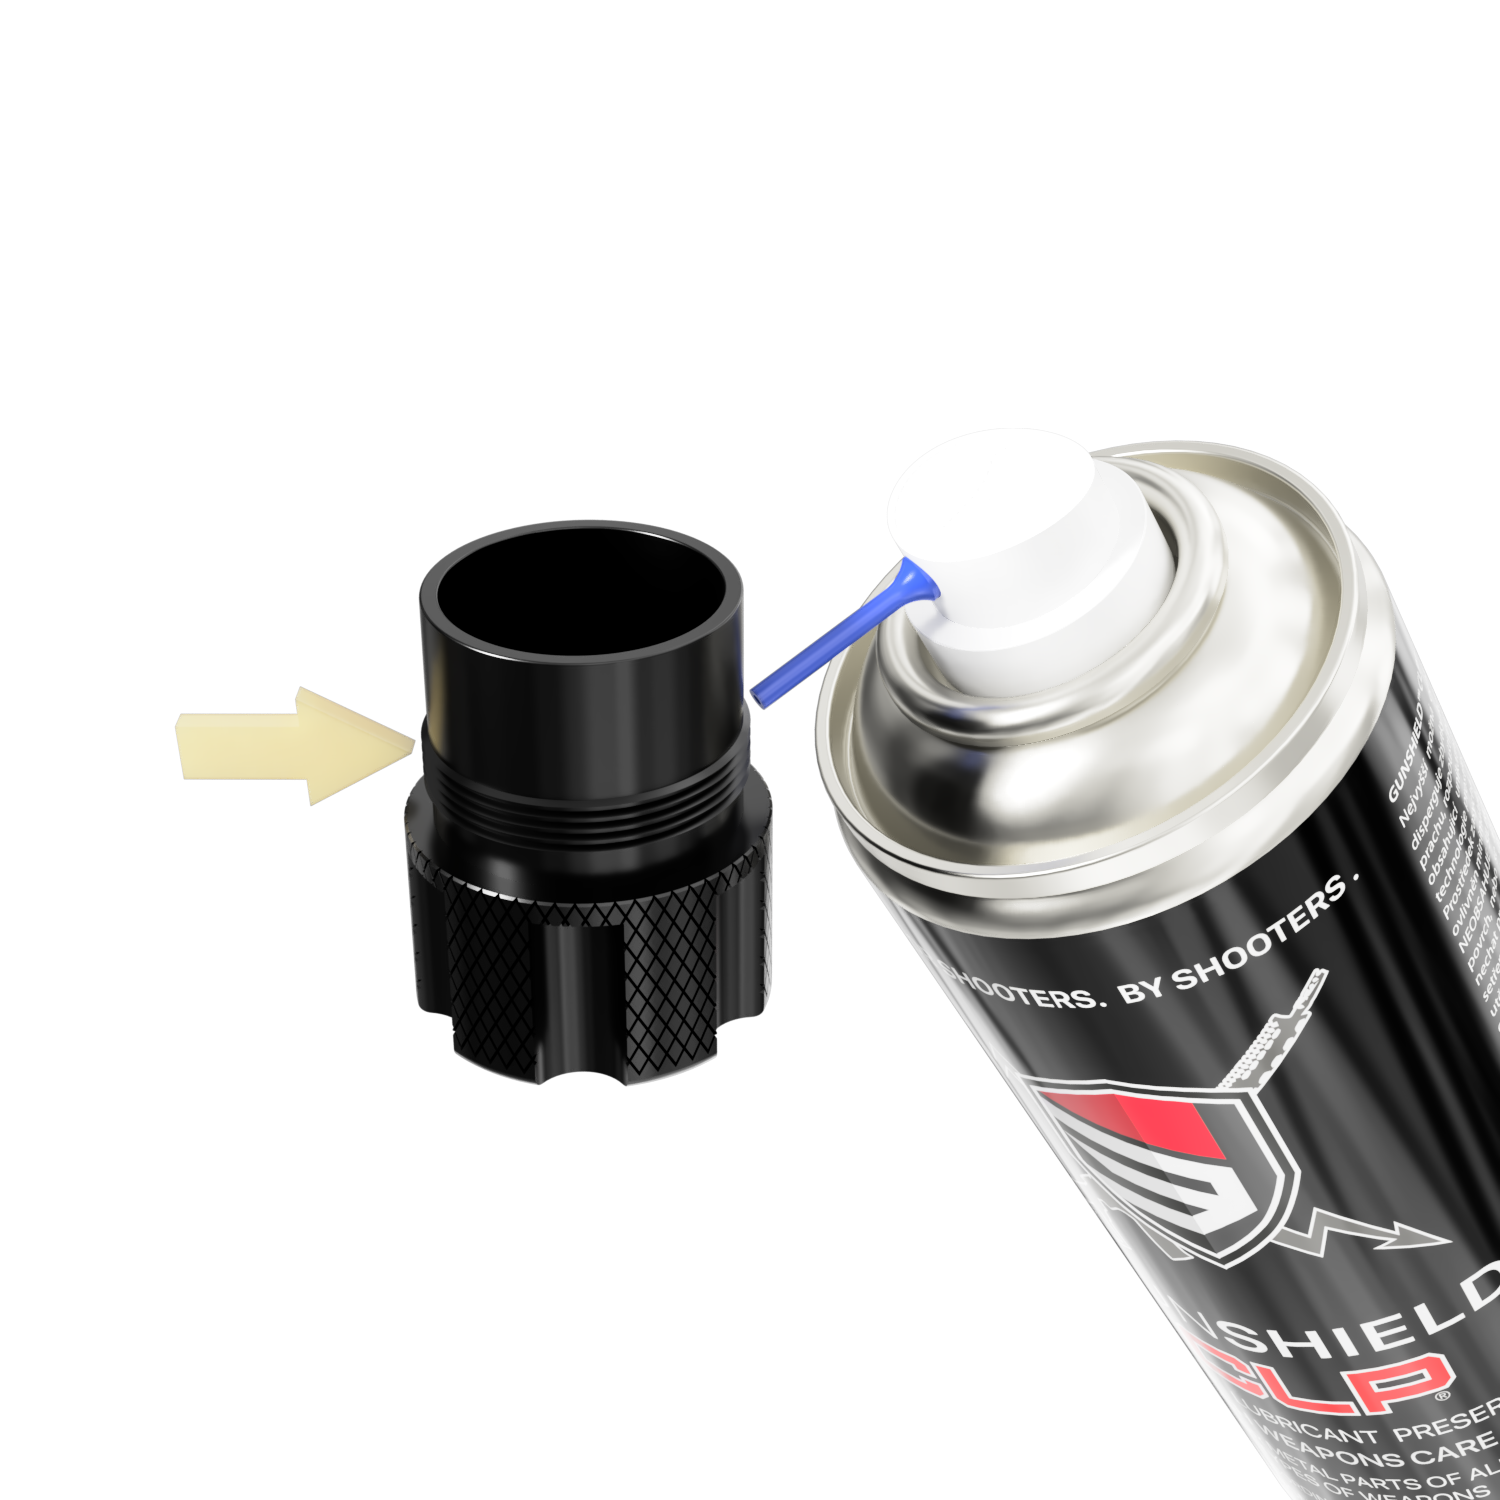
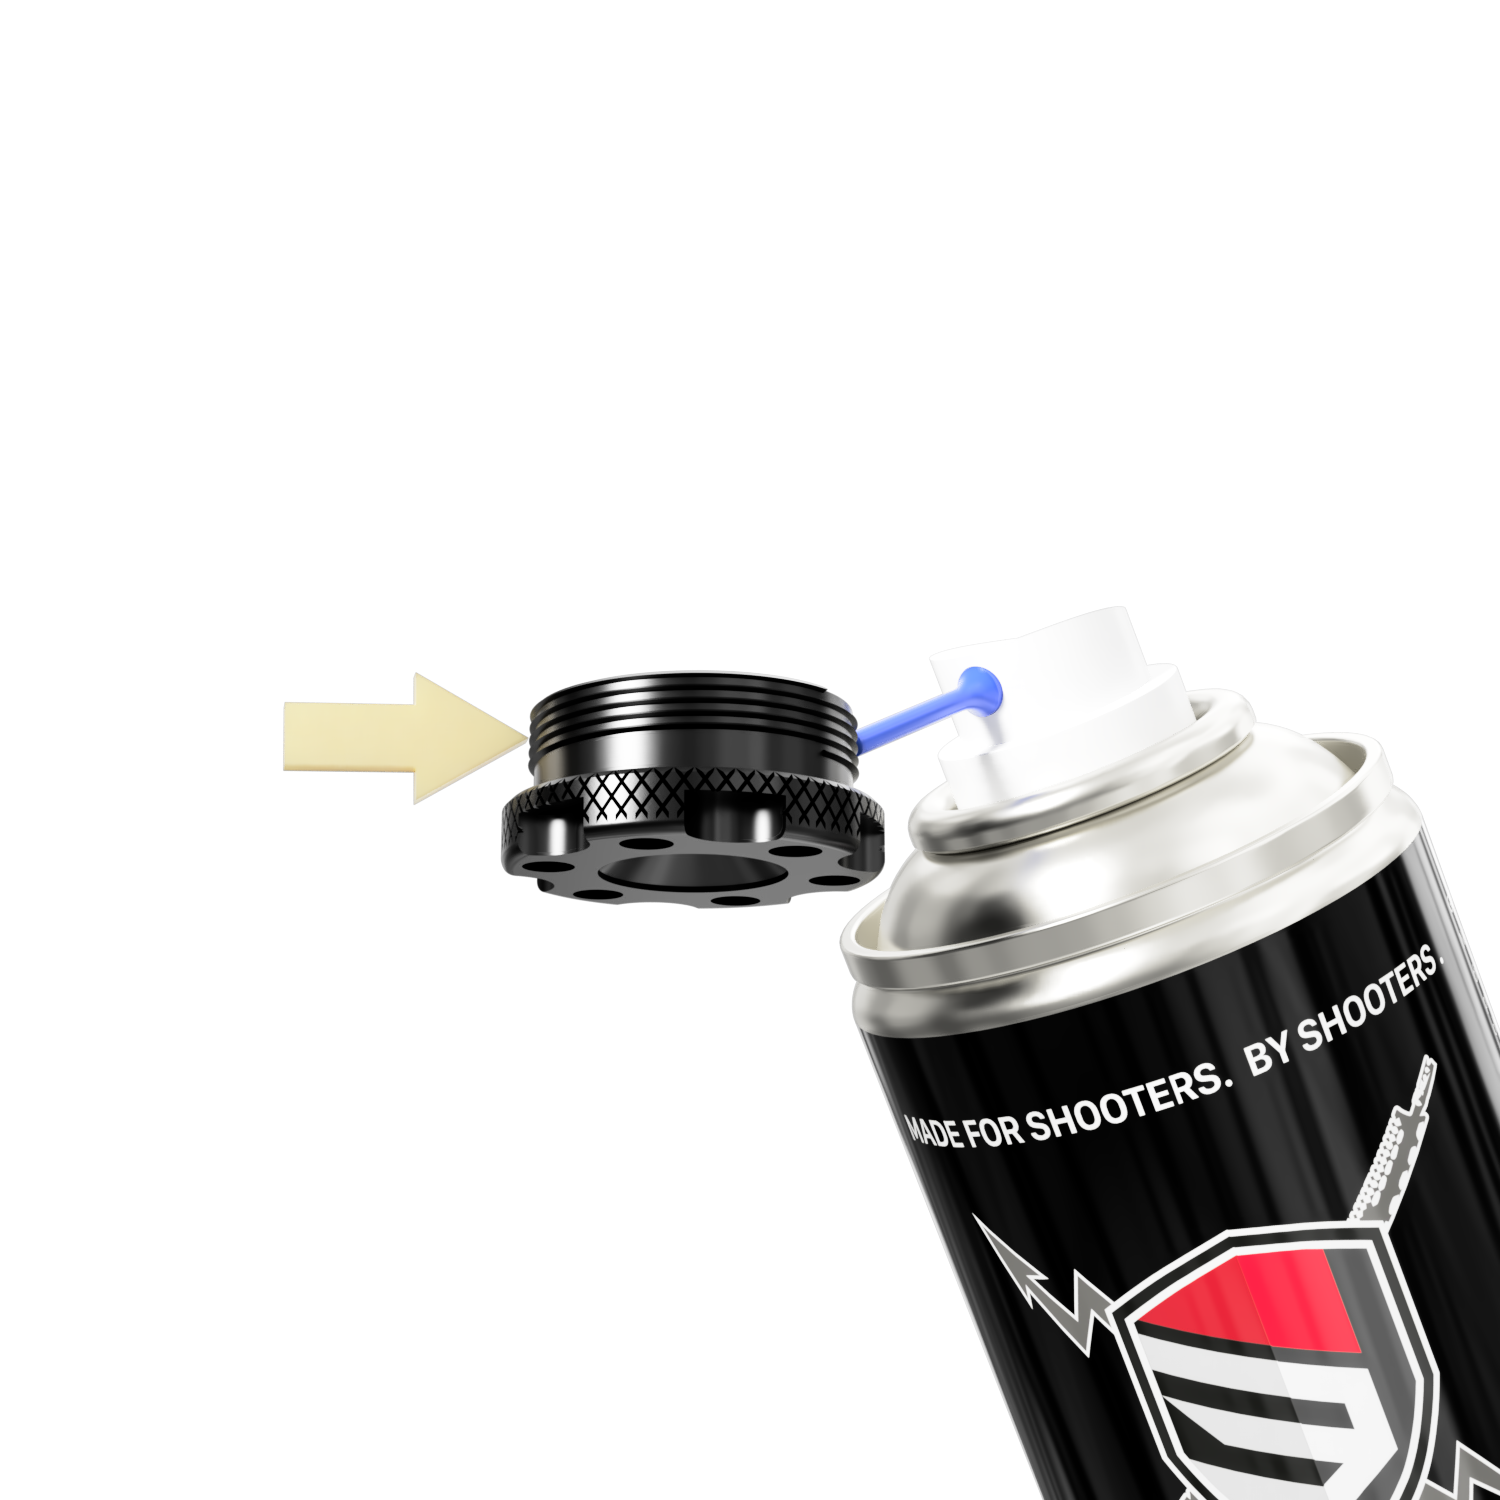
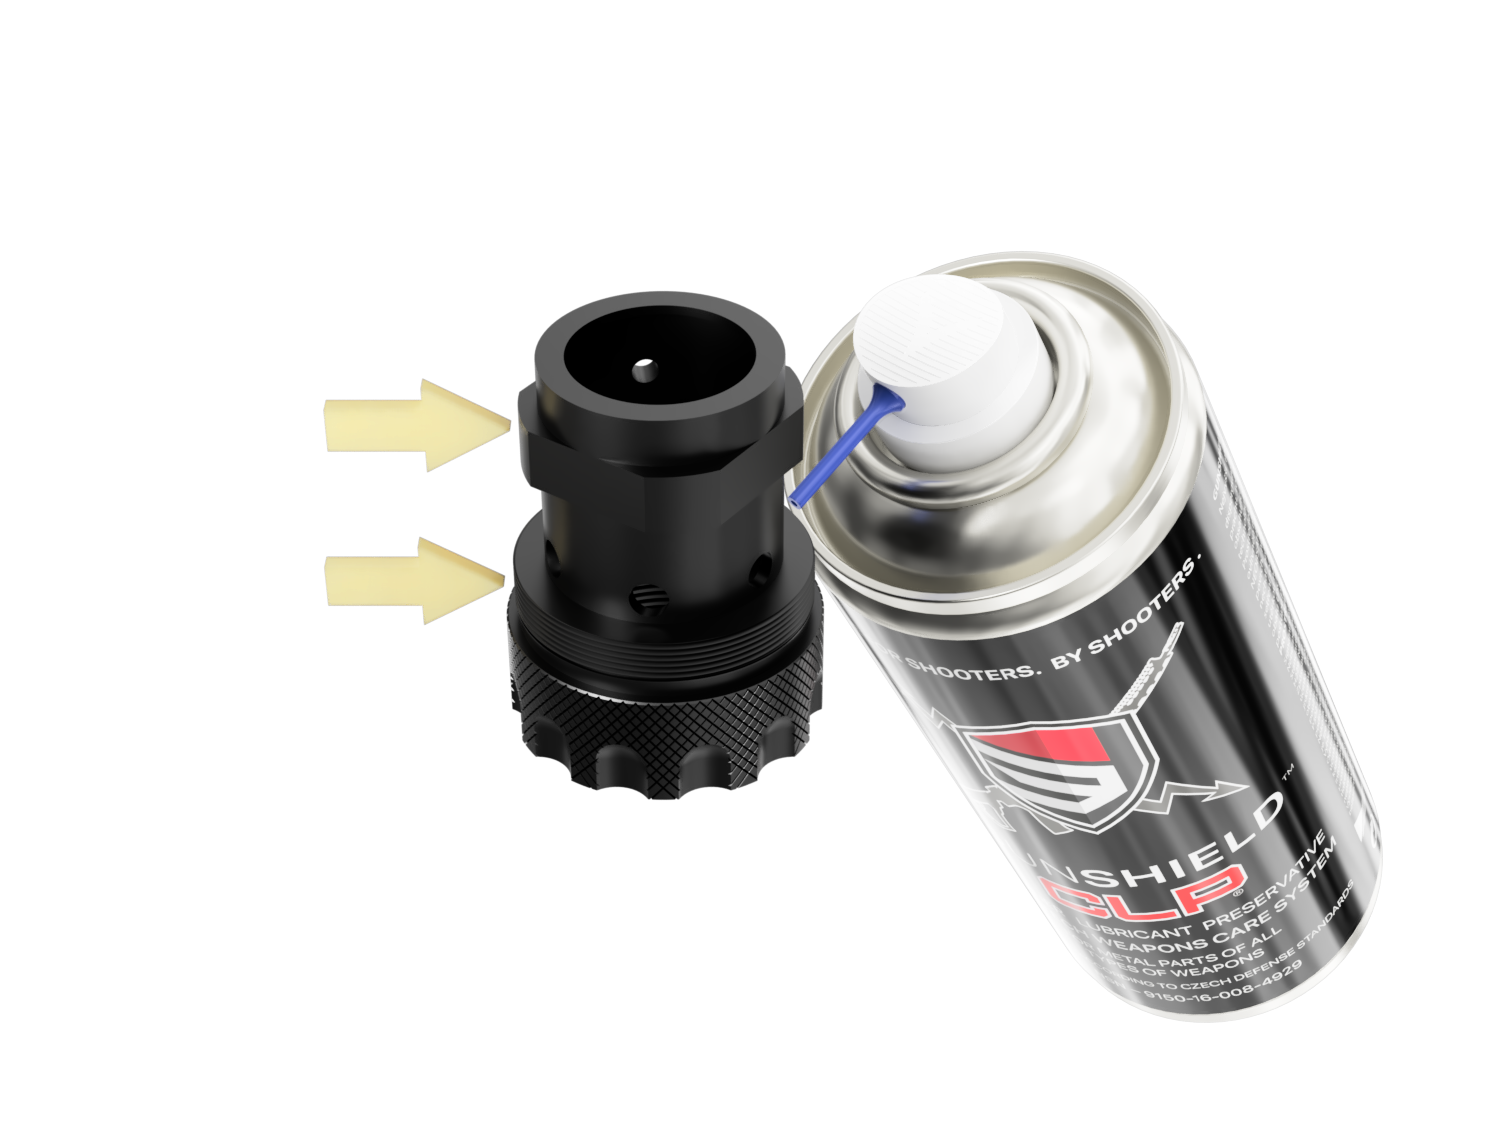
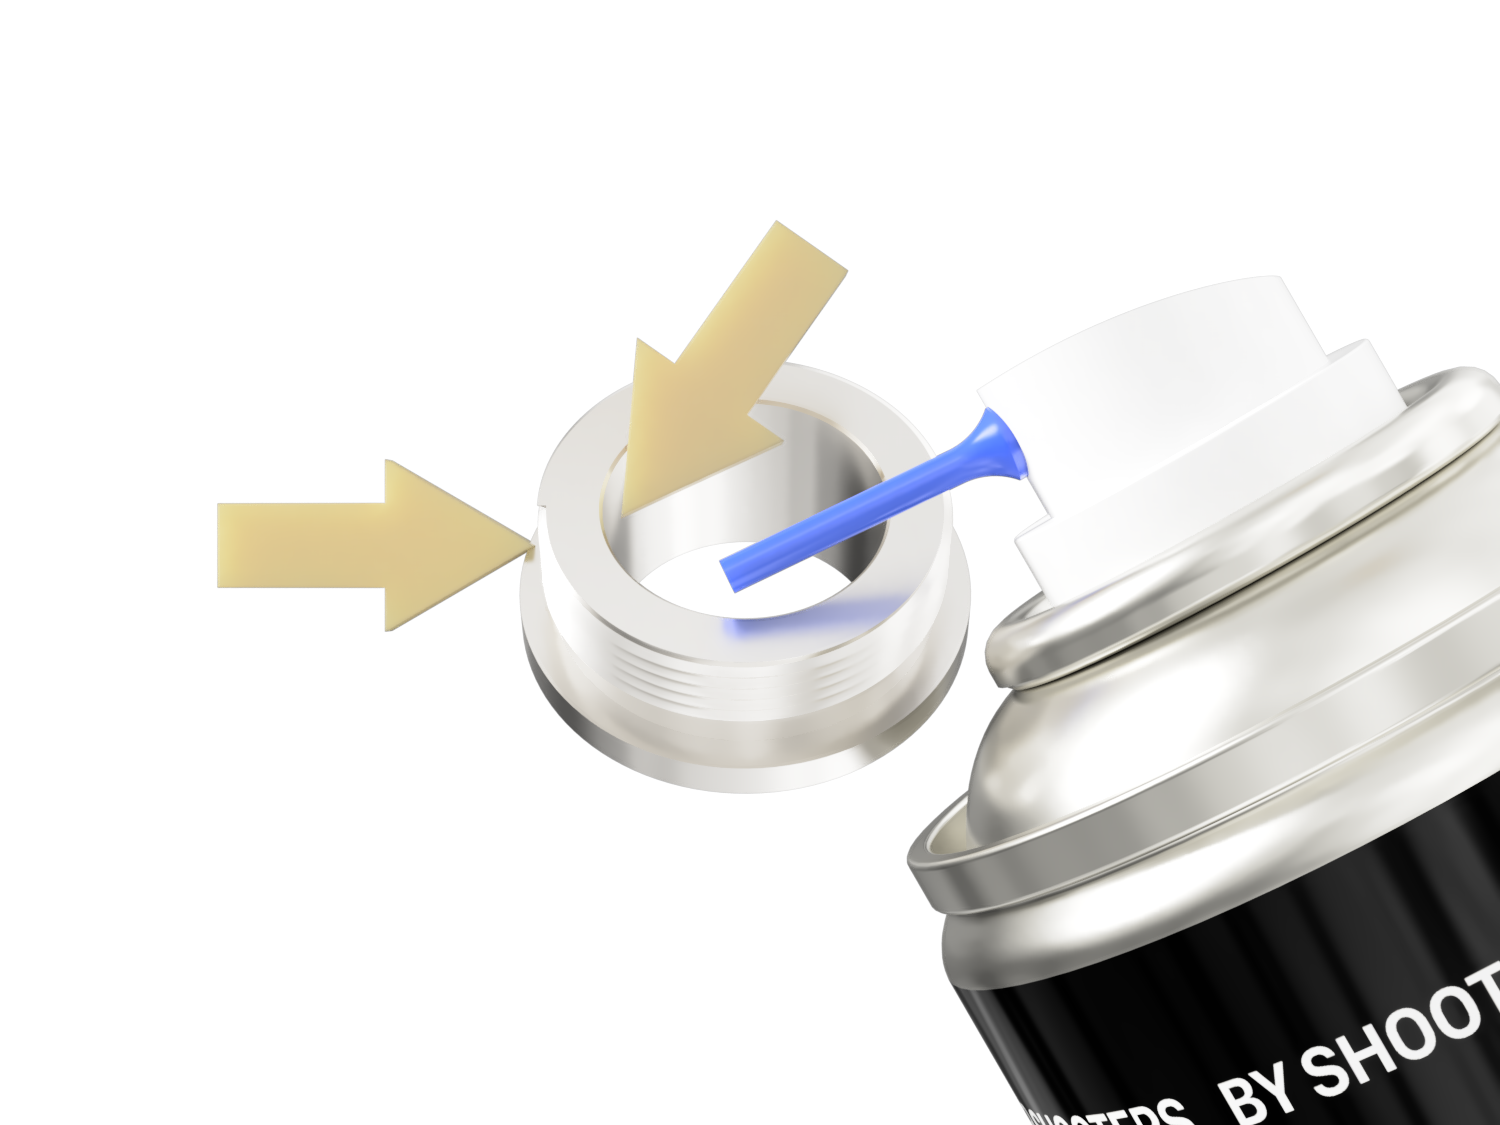
Check that all threaded connections are clean before reassembling the silencer. Loose dirt often gets into them when cleaning other parts of the silencer. For cleaning the threads, we recommend using brass brushes of circular cross-section (e.g. for cleaning the barrel). After cleaning, lubricate all threads with a suitable lubricant (e.g. with Breakfree CLP lubricant).
To increase the reliability of the function, it is advisable to lightly lubricate the moving parts of the pulse amplifier (piston and rear face) with a suitable lubricant after cleaning. Do not use unnecessarily large amounts of lubricant. This will increase the amount of smoke produced during firing. To lubricate these parts, we recommend CLP type lubricants. Use of an improper lubricant may result in it adhering to the surface of the moving parts of the silencer, causing jams during fi ring.
Lubricating of threads and friction areas
After cleaning and drying the silencer, it is necessary to treat these parts of the silencer with a suitable lubricant:
• all threads
• pulse amplifier piston body
• inner part of the rear face of the pulse amplifier (nut)
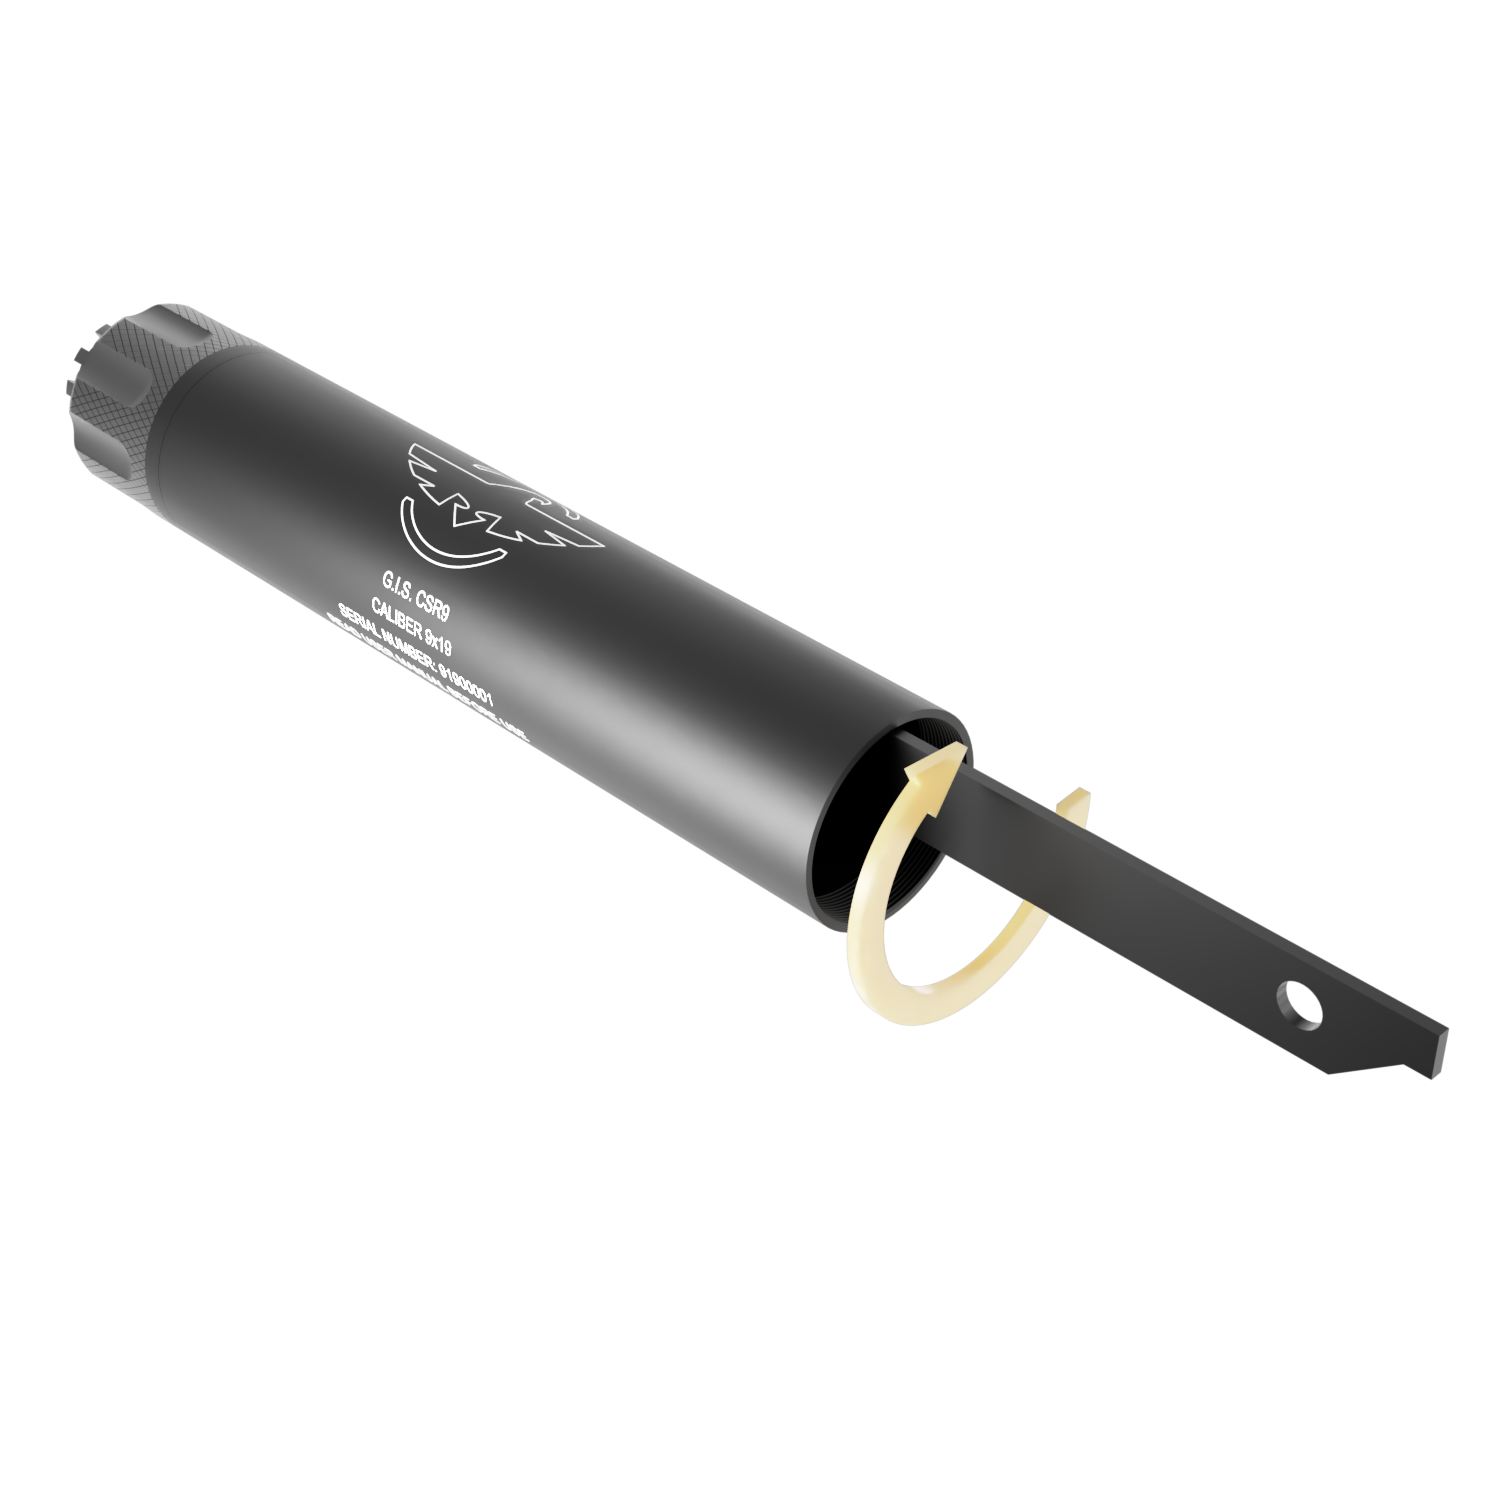
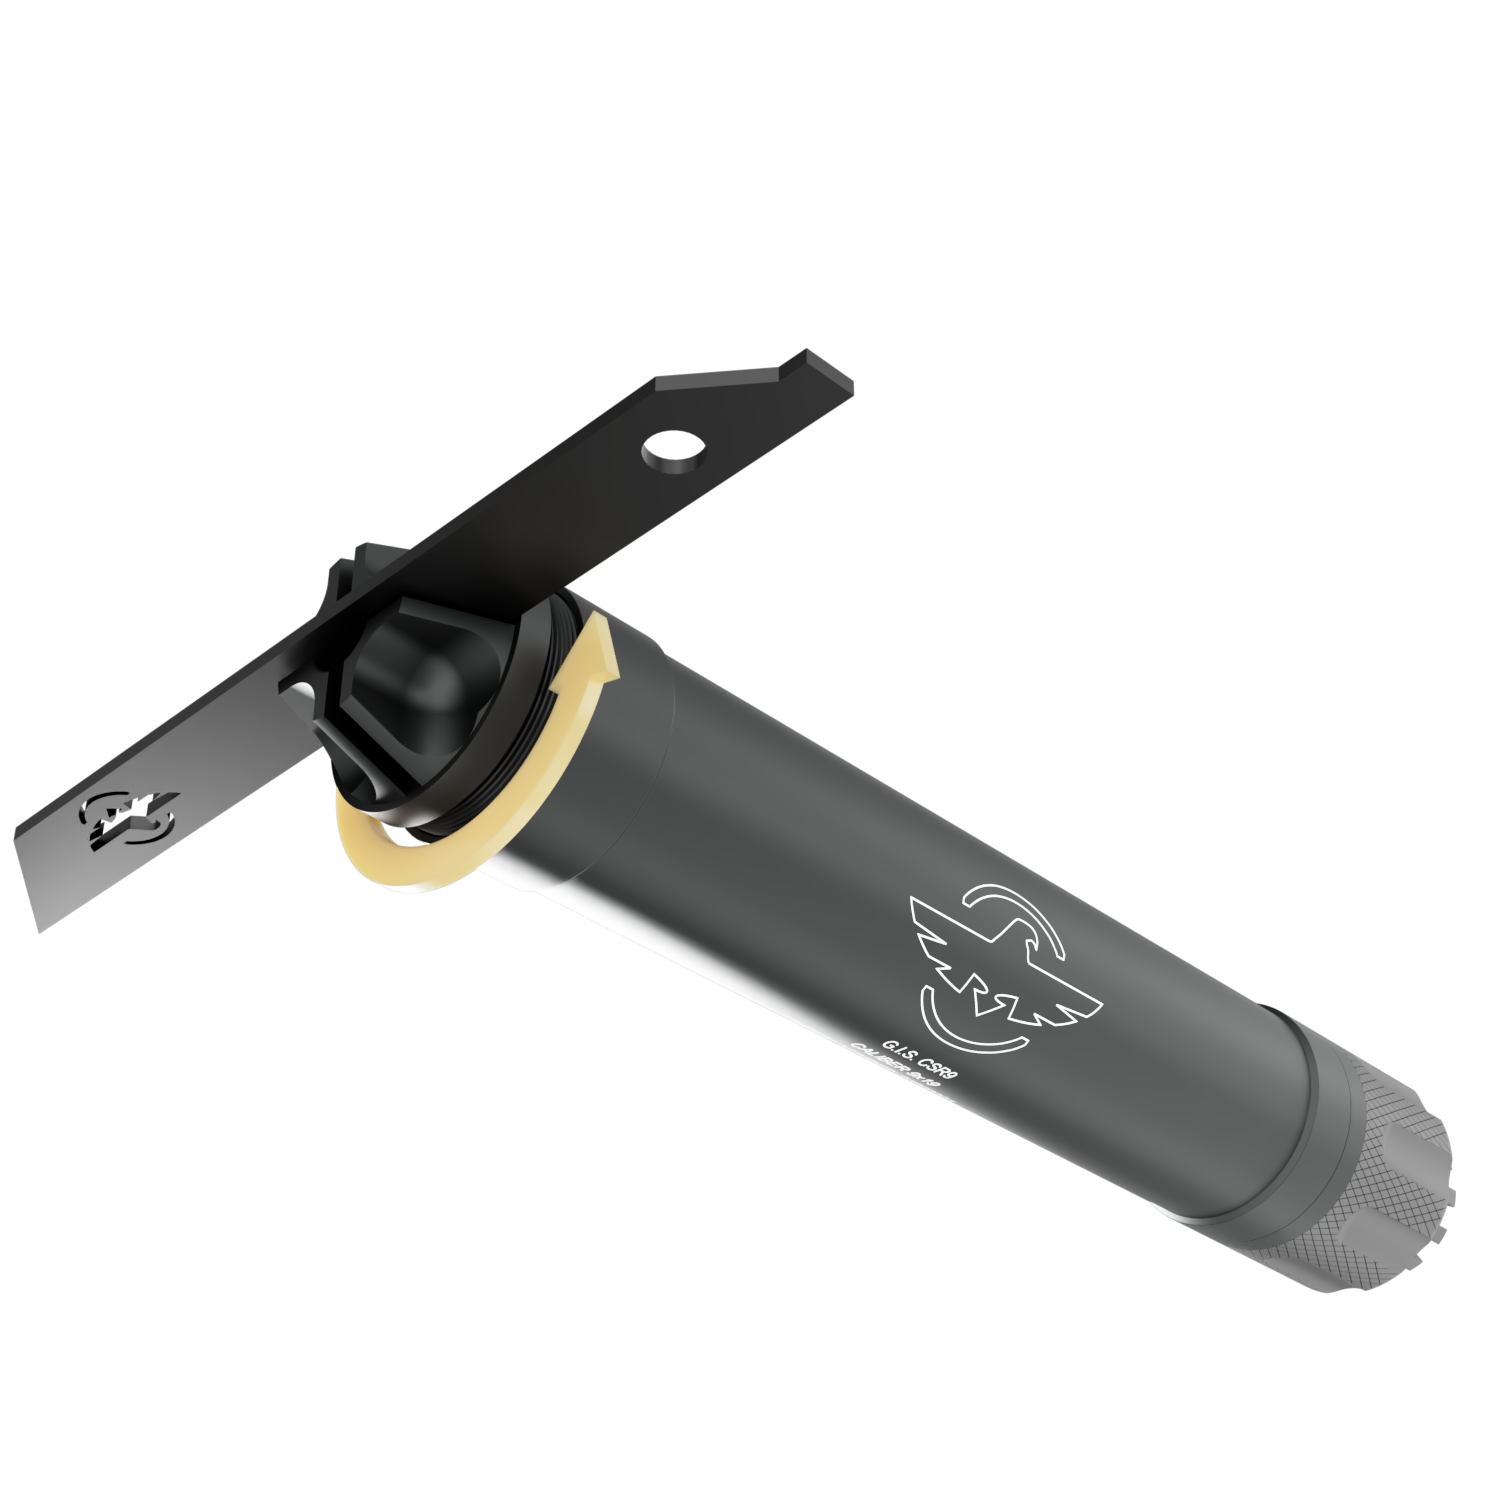
G.I.S. CSR9
Procedure for disassembling the silencer
The silencer may only be disassembled after it has been removed from the firearm!
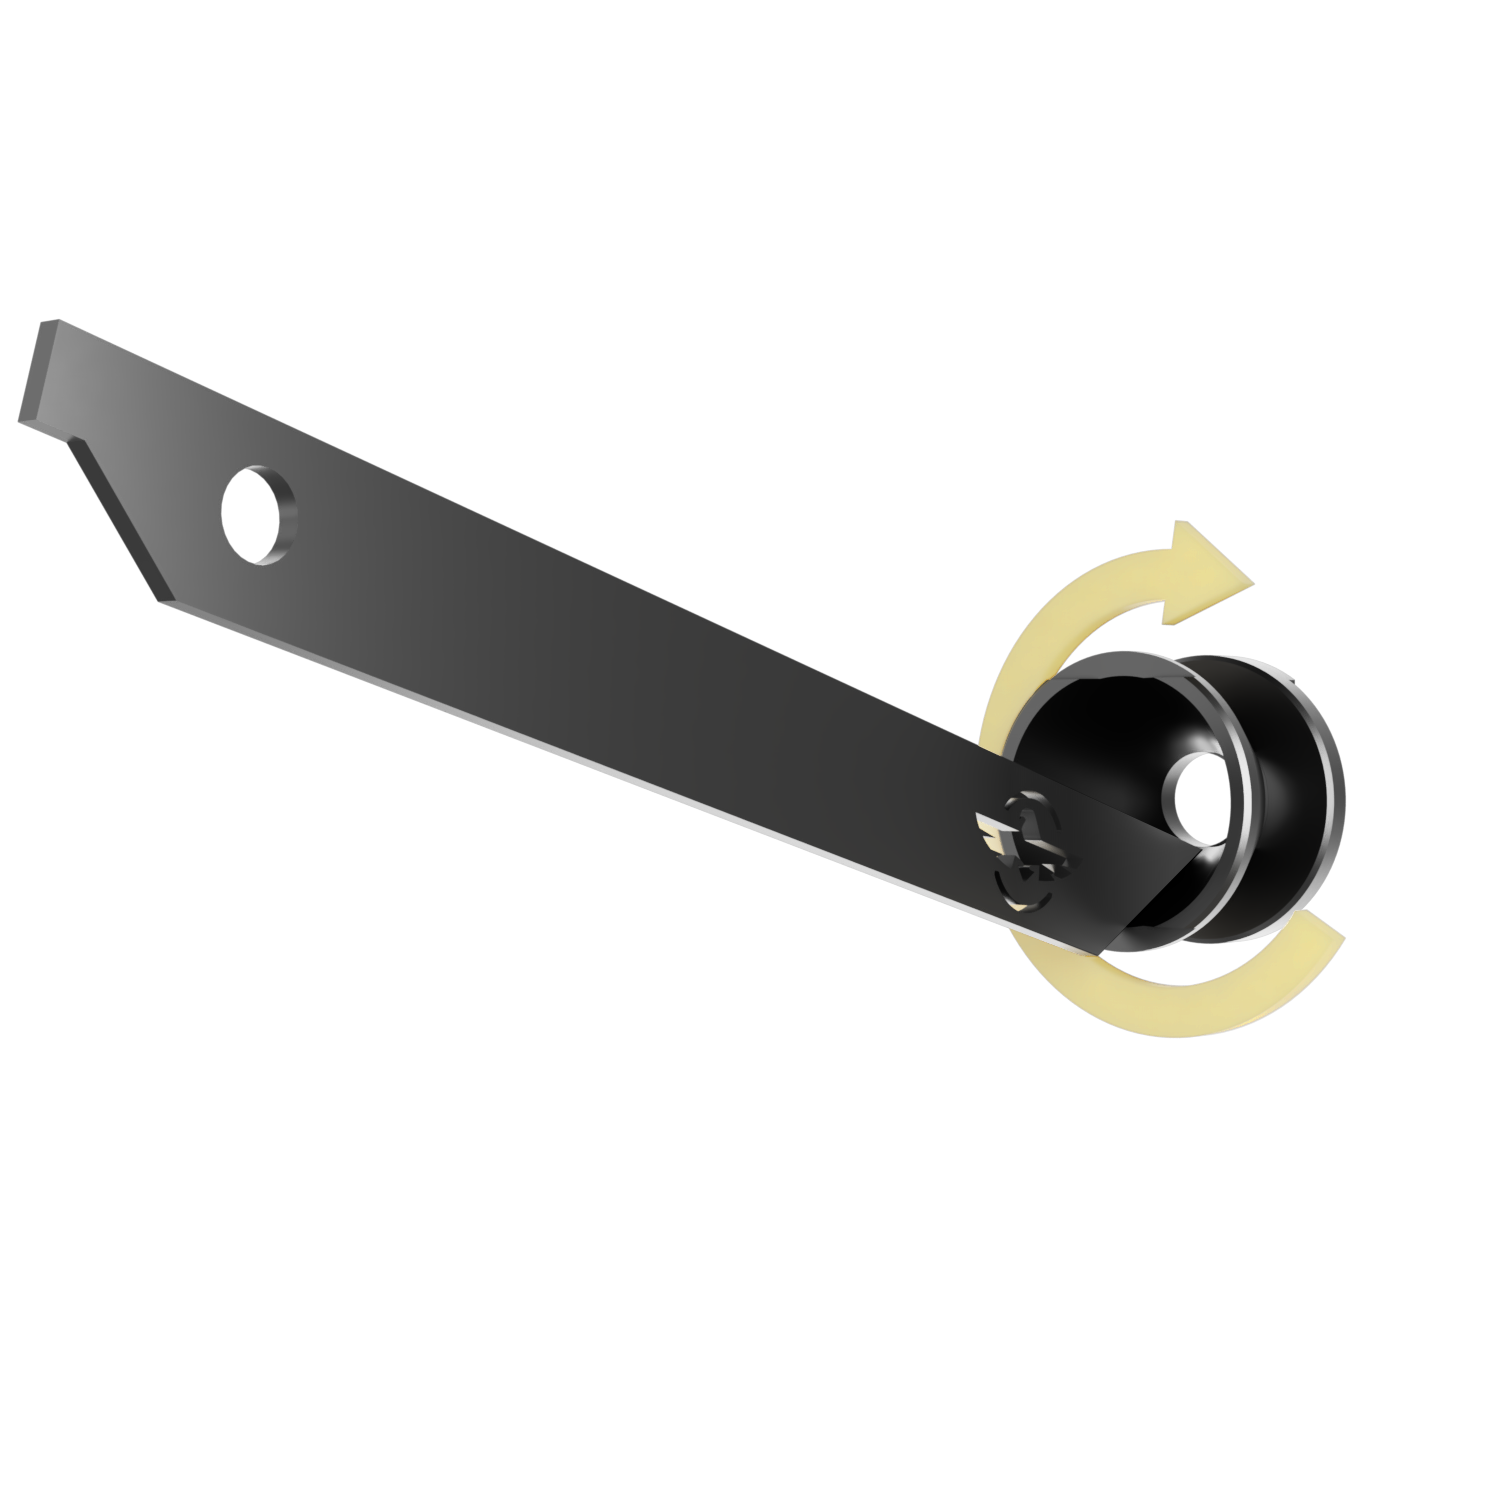
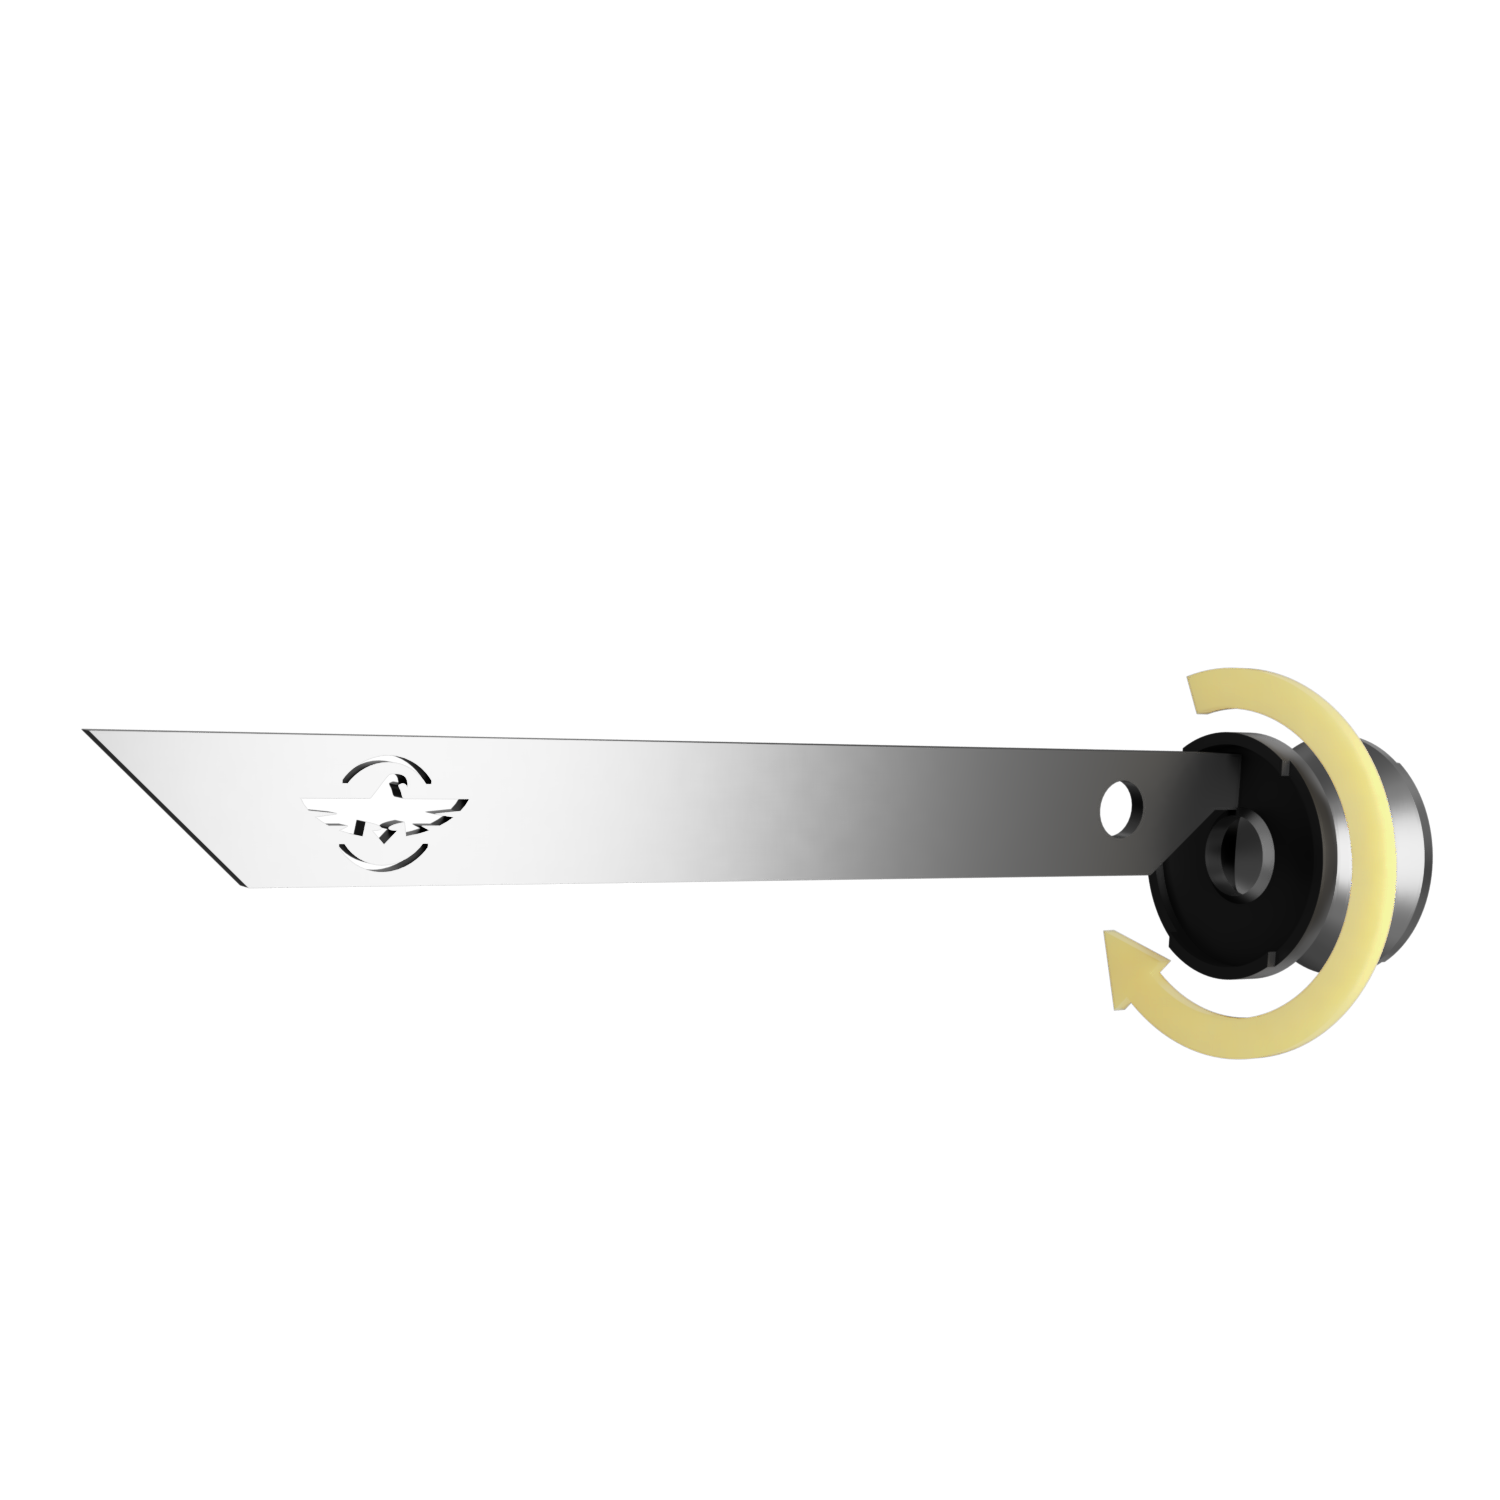
First, loosen the front face of the silencer with the enclosed wrench. Subsequently, it is possible to push the damping baffles out of the silencer body. In case of heavy pollution, it is possible to extrude the baffles by using a rod made of a soft material (wood, plastic, aluminum).
Reassembly of the silencer
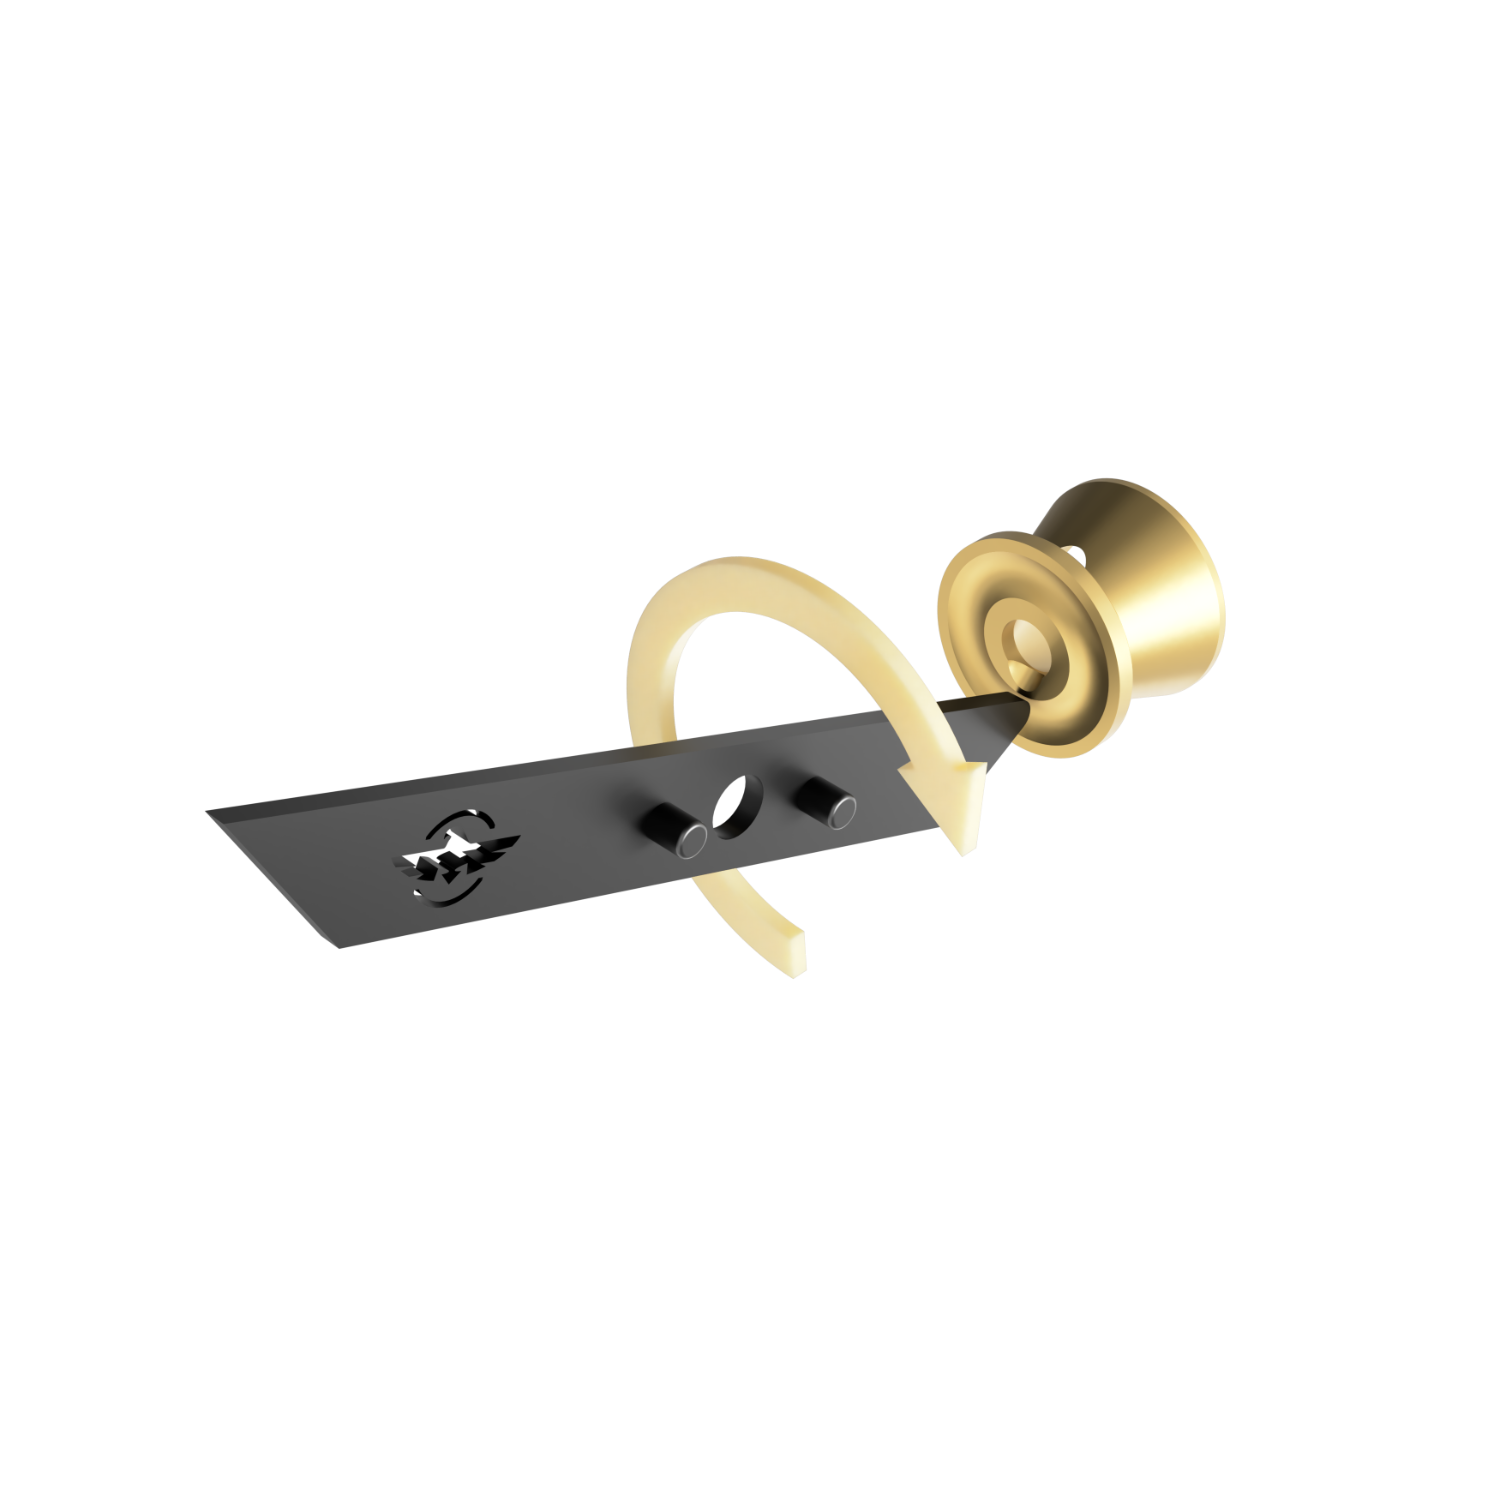
The reassembly of the damper takes place in the reverse order, you just need to make sure that the expansion partition is placed first, away from the muzzle of thebarrel.
The front face of the silencer must be properly tightened when it is used, as it holds the silencer baffles in the correct position to ensure the integrity of the entire silen- cer.
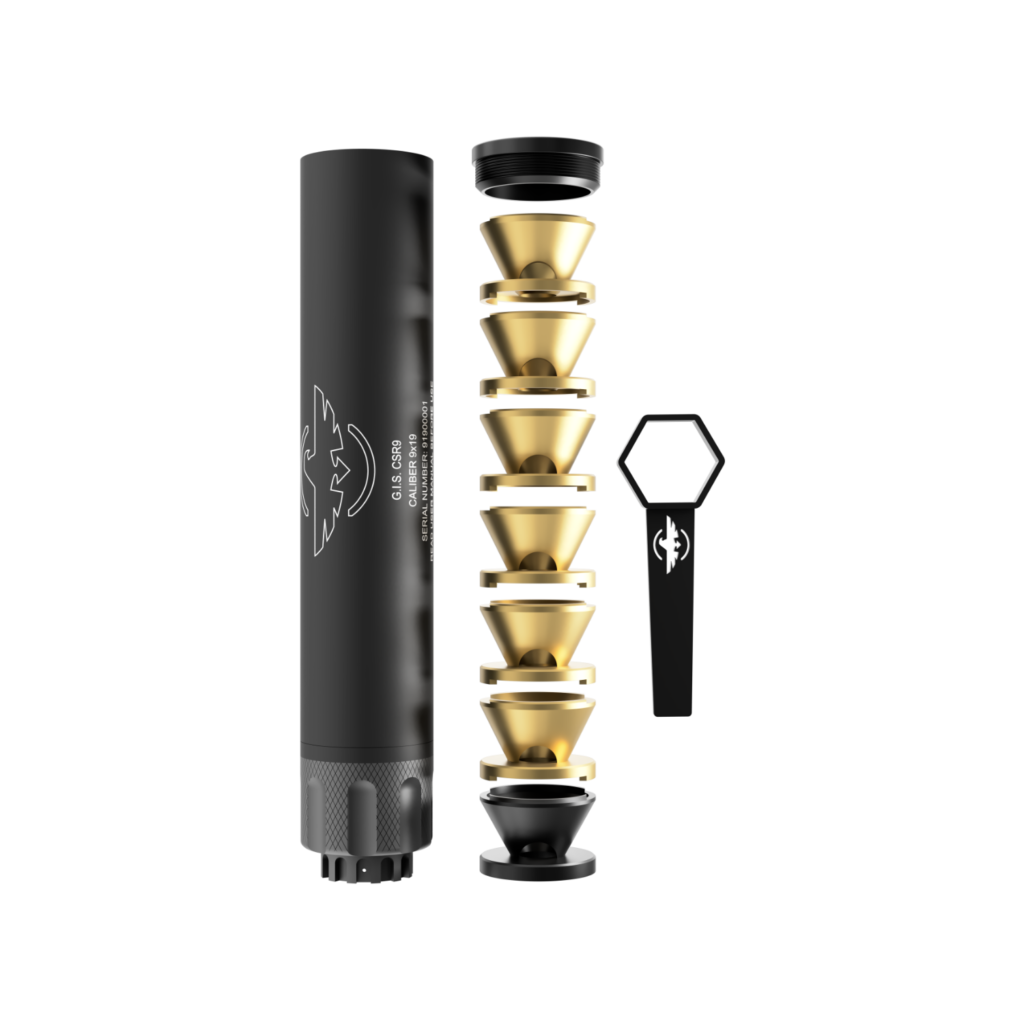
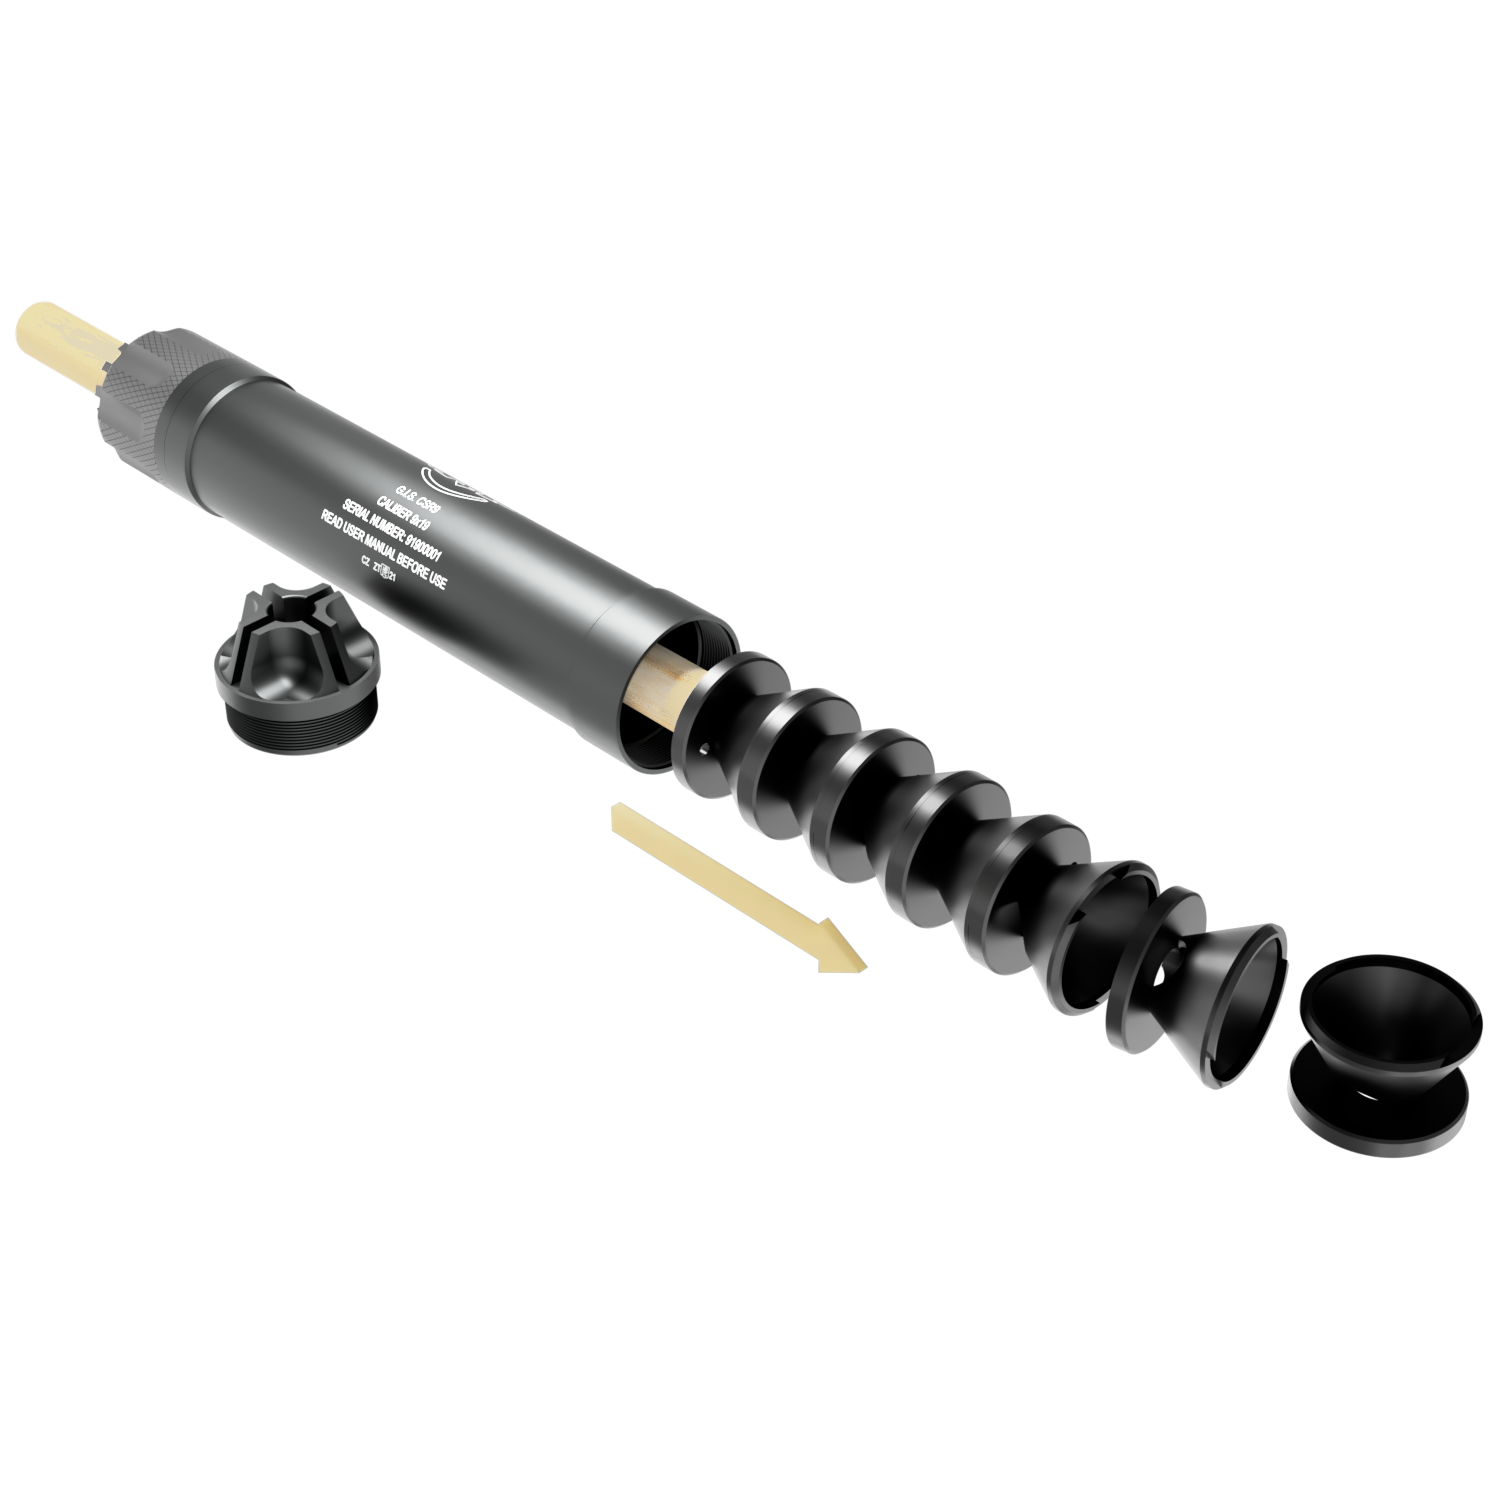
Silencer body
Disassembly tool
Front cap
Baffles
Expansion baffle
Silencer cleaning
The internal components of the silencer are intensively clogged with combustion products during firing, and therefore it is necessary to clean the silencer after firing up to 500 shots. The more often is the silencer cleaned, the easier its cleaning becomes. The manu- facturer therefore recommends cleaning the silencer after each use. Only in this way is it possible to guarantee its maximum efficiency and reliability of the weapon-silencer system. Do not use sharp tools when cleaning, as they may damage the surface protection of its components. It is advisable to use cleaning agents which dissolve combustion particles.
ATTENTION! Never use volatile substances for cleaning. Their use can cause a malfunction of the silencer and endanger human health and life.
After several dozen shots, it is usually no longer possible to clean the silencer using only a cloth and detergent, but it is necessary to mechanically remove the layer of fume deposits on all internal parts of the silencer. It is therefore advisable to use a suitable tool made of a hard material to remove this layer.
It is best to use the original „GIS cleaning tool“ to clean the inside of the silencer body and partitions. A wire brush with softer wires can be used to clean screw-threads and less soiled parts.
Before reassembling the silencer, make sure that all threaded connections are clean. It of- ten happens that loose dirt gets into them during cleaning of other parts of the silencer. We recommend using round brass brushes for screw-thread cleaning (e.g., for barrel cleaning).
After cleaning, lubricate all screw-threads with a suitable lubricant. Do not use an unnece- ssarily large amount of lubricant. This would increase the amount of smoke produced by shot.
G.I.S. CSR9 WB STEEL
Procedure for disassembling the silencer
The silencer may only be disassembled after it has been removed from the firearm!
First, loosen the front face of the silencer with the enclosed wrench. Subsequently, it is possible to push the damping baffles out of the silencer body. In case of heavy pollution, it is possible to extrude the baffles by using a rod made of a soft material (wood, plastic, aluminum).
Reassembly of the silencer
The reassembly of the damper takes place in the reverse order, you just need to make sure that the expansion partition is placed first, away from the muzzle of the barrel.
The front face of the silencer must be properly tightened when it is used, as it holds the silencer baffles in the correct position to ensure the integrity of the entire silen- cer.
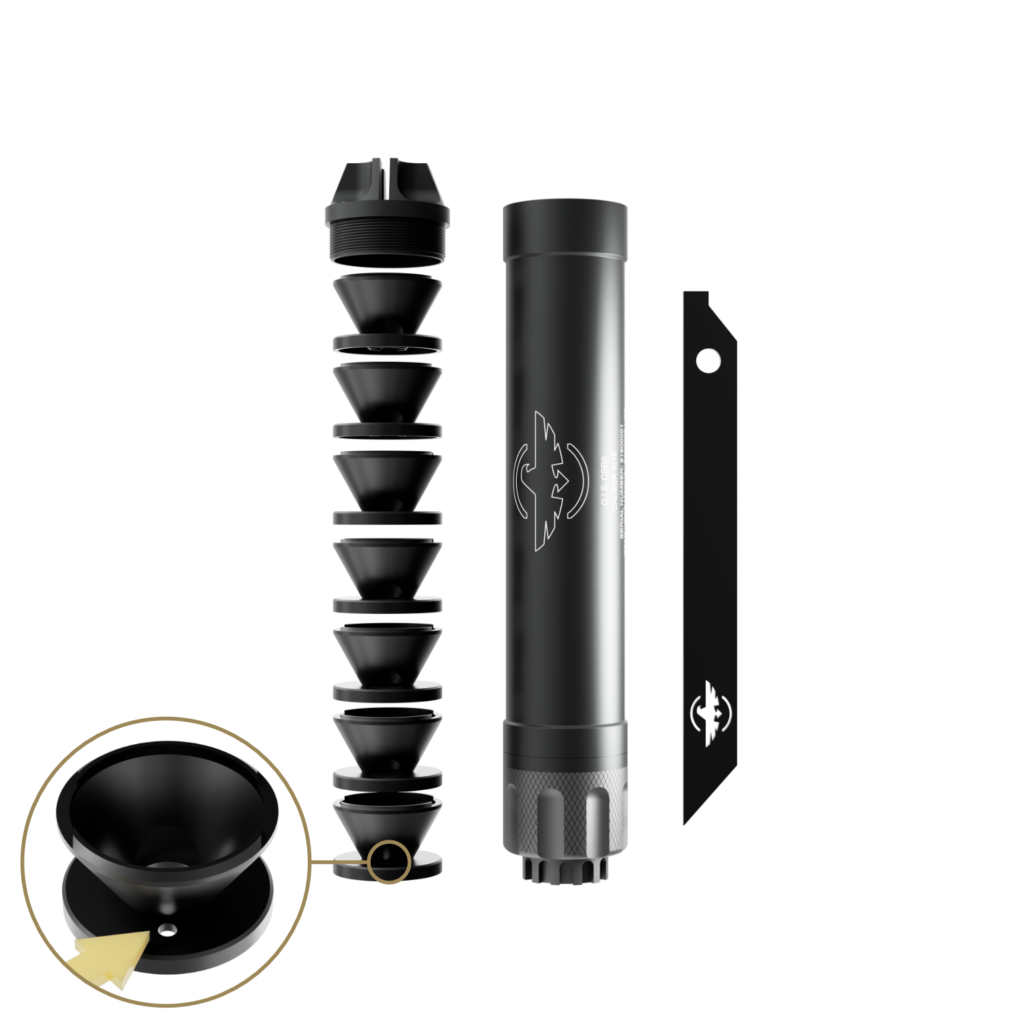
Silencer body
Disassembly tool
Front cap
Baffles
Expansion baffle
Silencer cleaning
The internal components of the silencer are intensively clogged with combustion products during firing, and therefore it is necessary to clean the silencer after firing up to 500 shots. The more often is the silencer cleaned, the easier its cleaning becomes. The manu- facturer therefore recommends cleaning the silencer after each use. Only in this way is it possible to guarantee its maximum efficiency and reliability of the weapon-silencer system. Do not use sharp tools when cleaning, as they may damage the surface protection of its components. It is advisable to use cleaning agents which dissolve combustion particles.
ATTENTION! Never use volatile substances for cleaning. Their use can cause a malfunction of the silencer and endanger human health and life.
After several dozen shots, it is usually no longer possible to clean the silencer using only a cloth and detergent, but it is necessary to mechanically remove the layer of fume deposits on all internal parts of the silencer. It is therefore advisable to use a suitable tool made of a hard material to remove this layer.
It is best to use the original „GIS cleaning tool“ to clean the inside of the silencer body and partitions. A wire brush with softer wires can be used to clean screw-threads and less soiled parts.
Before reassembling the silencer, make sure that all threaded connections are clean. It of- ten happens that loose dirt gets into them during cleaning of other parts of the silencer. We recommend using round brass brushes for screw-thread cleaning (e.g., for barrel cleaning).
After cleaning, lubricate all screw-threads with a suitable lubricant. Do not use an unnece- ssarily large amount of lubricant. This would increase the amount of smoke produced by shot.
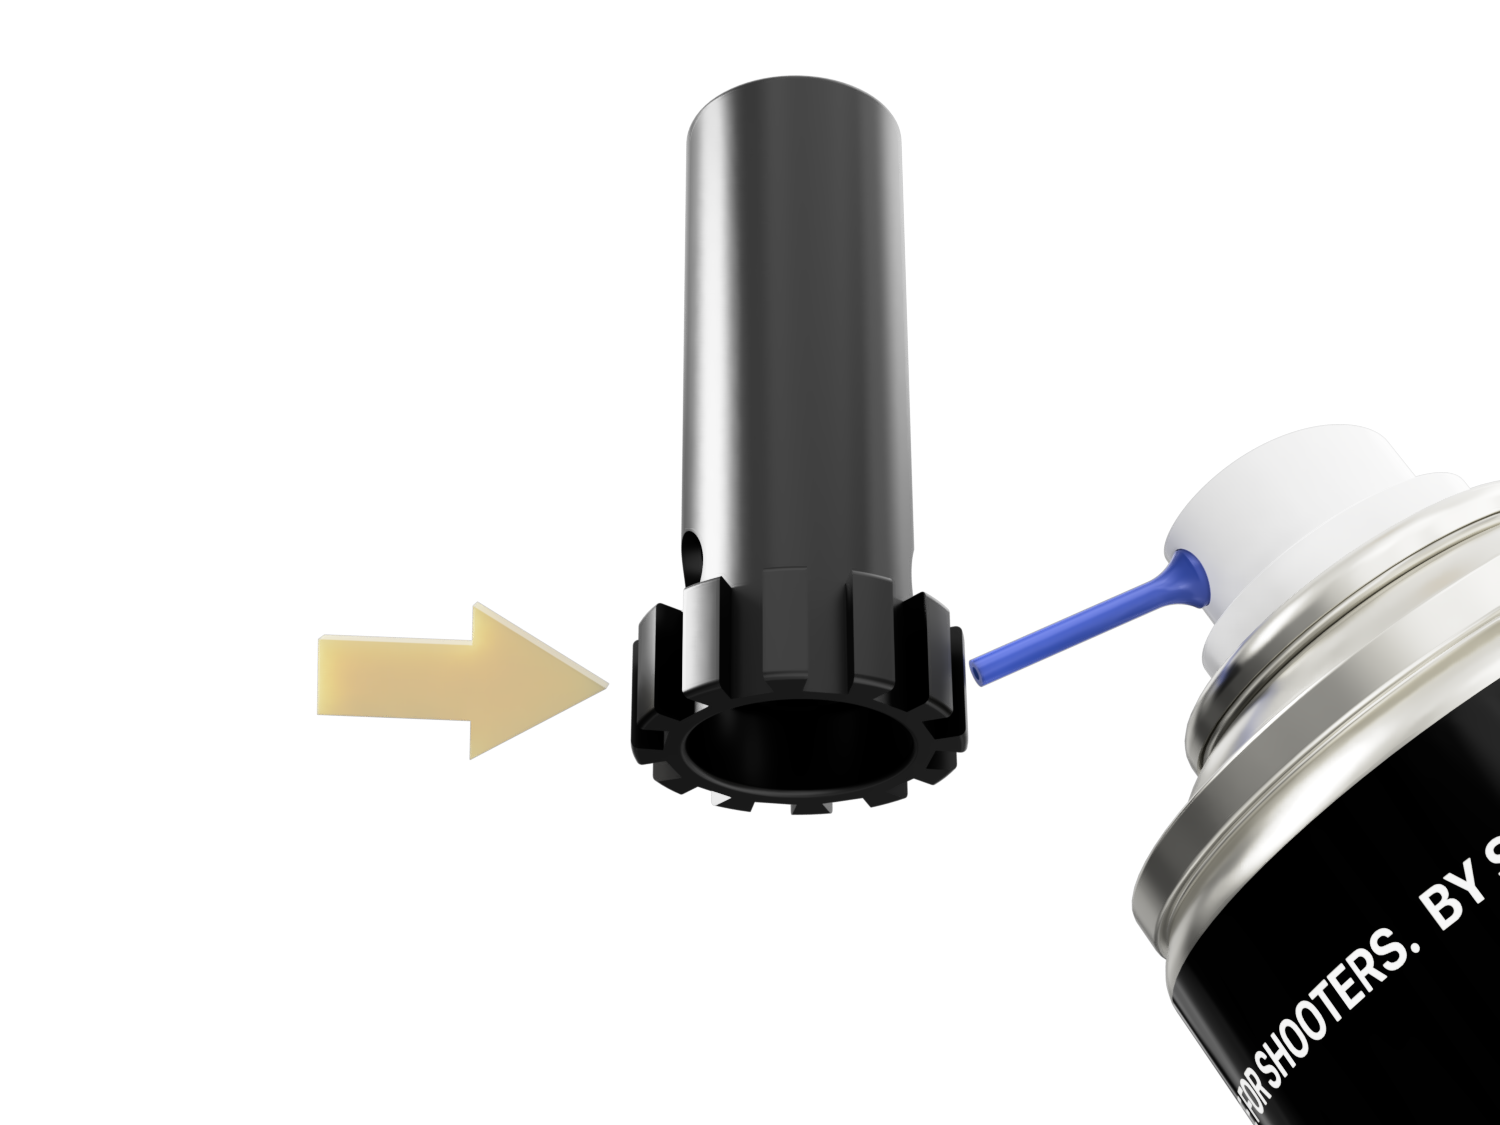
G.I.S. RSR and RSR WB STEEL
For safety reasons, the RSR and RSR WB Steel supressors cannot be disassembled.
However, they can be cleaned chemically – by rinsing cleaning solution. It is advisable to use cleaning agents that dissolve combustion products.
Chemical solutions designed for cleaning black gunpowder muzzle-loaders work very well. Strictly follow the manufacturer‘s instructions when using them. When pouring the cleaning solution from the suppressor and its flushing it is necessary to hold the suppressor mouth up. Another position will not allow the cleaning agent to drain away completely.
Before using the suppressor after cleaning, dry it thoroughly and make sure the center hole the suppressor is free throughout in its entire length. Do not use for cleaning sharp tools that can damage the surface protection of its components.
The internal components of the suppressor are intensively clogged with combustion produ- cts during firing, and therefore it is necessary to clean the suppressor.
We recommend to clean the suppressor always after firing up to 500 shots.
The more often the silencer is cleaned, the easier the cleaning process is.
Before using the suppressor after cleaning, dry it thoroughly and make sure the center hole the suppressor is free throughout in its entire length.
ATTENTION! Never use volatile substances for cleaning. Their use can cause a malfunction of the silencer and endanger human health and life.
